
Home Automation With Raspberry Pi, Mqtt, And Espruino
Made by Espruino
About the project
Automate your home with Raspberry Pi, MQTT, and Espruino
Project info
Items used in this project
Hardware components


Story
Setting up your Pi
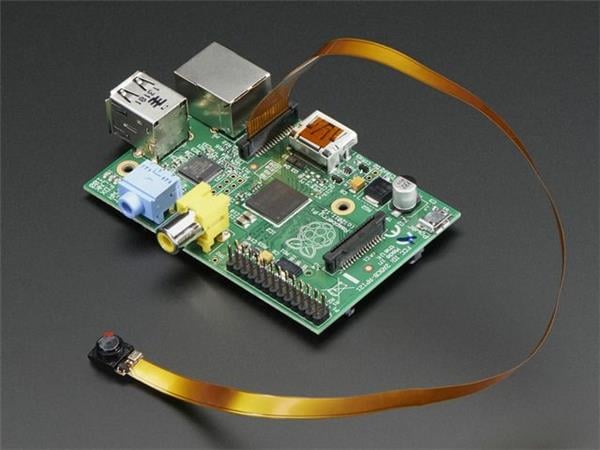
First, you'll need a Raspberry Pi (ideally a Zero W or a Pi 3) with at least an 8gb SD card.
Get Raspbian Lite from here: https://www.raspberrypi.org/downloads/raspbian/
Follow the instructions for putting Raspbian on an SD card: https://www.raspberrypi.org/documentation/installation/installing-images/README.md
Once done, we need to set up 'headless' WiFi on the Pi
Unplug the SD card and plug it back in, and some new drives should appear.
Open the
bootdrive, and create a new file calledsshin it. It can be empty, but it's important that the file has noextension like.txt. This will enable the SSH Server so we can connect to the Pi wirelessly when it boots.If your Pi has WiFi which you want to use, create a file in the same drive called
wpa_supplicant.confand put the following text in it, filling in the blanks with your WiFi key and password.
- network={
- ssid="YourNetworkSSID"
- psk="Your Network's Passphrase"
- key_mgmt=WPA-PSK
- }
If you're on Windows, make sure you're using an editor like Notepad++ that allows you to set the line ending style to Unix, not Windows.
Eject the SD card in the OS, take it out of your PC and stick it in the Pi. Then plug the Pi into a USB phone charger (using the
PWRUSB socket if you're on a Pi Zero W).Wait a few minutes until the activity LED stops flashing (sometimes you'll be able to check your router's status page to see if the Pi has connected).
Now it's time to install an SSH client. If you're on Linux of Mac OS you already have one, but if you're on Windows you'll want to download and run PuTTY.
Now connect via SSH to
raspberrypi(orraspberrypi.local) with usernamepi. You can do this with a menu in PuTTY, or on other platforms just open a command prompt and typessh pi@raspberrypi. When asked for a password, typeraspberry.
Now it's time to make sure the operating system is sized to your SD card.
Type
sudo raspi-configUse the arrow keys to go to
Advanced Optionsand press Enter, then chooseA1 Expand Filesystem. You can also change the password and default hostname (that's currentlyraspberrypi) here, but I won't cover that.After that, press the right arrow twice to select
Finish, then pressEnterPress
Yesto rebootNow wait a minute, then reconnect with
piatraspberrypiagain.Make sure all the package lists are up to date by typing
sudo apt-get updateType
sudo apt-get install mosquitto mosquitto-clients bluetooth bluez libbluetooth-dev libudev-devand press enter when prompted to install some packages we'll need - particularly the mosquitto MQTT serverCopy and paste this command to install the latest version of node-red and node, and agree when prompted:
bash <(curl -sL https://raw.githubusercontent.com/node-red/raspbian-deb-package/master/resources/update-nodejs-and-nodered)
It could take as long as half an hour to complete that step!
Now type
sudo systemctl start nodered.serviceto start the node-red serviceType
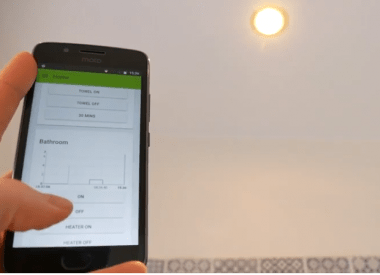
cd ~/.node-red && npm install node-red-contrib-uito install the node-red UI, which will give us a neat dashboard and some graphs. This might take a while!Type
sudo systemctl stop nodered.servicethensudo systemctl start nodered.serviceto restart the node-red service with the newUImodule we just installed. It may take a minute or two.Type
sudo systemctl enable nodered.serviceto set node-red to start on every bootNow that's done you should be able to go to http://raspberrypi:1880/
Drag an
injectnode from the left on to the pageDrag an
mqttnode from the output area on to the pageConnect the two nodes together by clicking and dragging between the squares on the end of them
Double-click on the MQTT node
In the menu that appears, type
/hellointoTopicUnder
ServerchooseAdd new mqtt-brokerand clickeditfill in
localhostfor server, now clickAdd, thenDoneto finish the nodeNow click 'Deploy' in the top right
Now type
mosquitto_sub -v -h raspberrypi -t "/#"in the SSH window - this will set the Pi listening for all MQTT events (#is a wildcard)If you click the button to the left of the
injectblock that saystimestampthen you should now see a message appearing.In the same way you can create MQTT block to listen for a specific message, and can use
mosquitto_pub -h raspberrypi -t "/hello" -m "message text"to send a message to it.
And that's it!
Interfacing with an Espruino WiFi
- var WIFI_NAME = "Espruino";
- var WIFI_OPTIONS = { password : "helloworld" };
- var MQTT_HOST = "raspberrypi";
- var PATH = "/mydevice/";
- var mqtt;
- var wifi;
- function mqttMessage(pub) {
- console.log(
- "MQTT=> ",pub.topic,pub.message);
- if (pub.topic==PATH+"1/set") {
- var v = pub.message!=0;
- digitalWrite(B3, !v);
- mqtt.publish(PATH+"1/status", v?1:0);
- }
- if (pub.topic==PATH+"2/set") {
- var v = pub.message!=0;
- digitalWrite(B4, !v);
- mqtt.publish(PATH+"2/status", v?1:0);
- }
- }
- function mqttConnect() {
- mqtt = require("MQTT").connect({
- host: MQTT_HOST,
- });
- mqtt.on('connected', function() {
- console.log("MQTT connected");
- // subscribe to wildcard for our name
- mqtt.subscribe(PATH+"#");
- });
- mqtt.on('publish', mqttMessage);
- mqtt.on('disconnected', function() {
- console.log("MQTT disconnected... reconnecting.");
- setTimeout(function() {
- mqtt.connect();
- }, 1000);
- });
- }
- setInterval(function() {
- if (!mqtt) return;
- mqtt.publish(
- PATH+"cputemp",
- E.getTemperature());
- }, 2*60*1000);
- setWatch(function() {
- if (!mqtt) return;
- mqtt.publish(
- PATH+"buttonpress",
- 1);
- }, BTN, {edge:"rising",repeat:true,debounce:50});
- function onInit() {
- console.log("Connecting to WiFi");
- wifi = require("EspruinoWiFi");
- wifi.connect(WIFI_NAME, WIFI_OPTIONS,
- function(e) {
- if (e) {
- console.log("Connection Error: "+e);
- return;
- }
- console.log("WiFi Connected");
- wifi.getIP(function(f,ip) {
- console.log("IP: ",ip);
- mqttConnect();
- });
- });
- }
Interfacing with a SonOff
But for those eager, the code is:
- var WIFI_NAME = "Espruino";
- var WIFI_OPTIONS = { password : "helloworld" };
- var MQTT_HOST = "raspberrypi";
- var PATH = "/mydevice/";
- var LED = D13;
- var RELAY = D12;
- var BTN = D0;
- var mqtt;
- var wifi;
- function setState(v) {
- RELAY.write(v);
- LED.write(!v);
- mqtt.publish(PATH+"status", v?1:0);
- }
- function mqttMessage(pub) {
- console.log("MQTT=> ",pub.topic,pub.message);
- if (pub.topic == PATH+"set") {
- setState(pub.message!=0);
- }
- if (pub.topic == PATH+"eval") {
- try {
- mqtt.publish(PATH+"response", eval(pub.message));
- } catch(e) {
- mqtt.publish(PATH+"exception", e.toString());
- }
- }
- }
- function mqttConnect() {
- mqtt = require("MQTT").connect({
- host: MQTT_HOST,
- });
- mqtt.on('connected', function() {
- console.log("MQTT connected");
- setTimeout(function() {
- mqtt.subscribe(PATH+"#");
- }, 1000);
- });
- mqtt.on('publish', mqttMessage);
- }
- function onInit() {
- console.log("Connecting WiFi");
- setInterval(function() {
- if (!mqtt) return;
- if (!mqtt.connected) {
- console.log("MQTT disconnected... reconnecting.");
- mqtt.connect();
- }
- }, 60*1000);
- wifi = require("Wifi");
- wifi.on('connected',function() {
- console.log("Connected to WiFi");
- });
- wifi.on('disconnected',function() {
- console.log("Disconnected from WiFi");
- });
- wifi.setHostname("MYDEVICE");
- wifi.stopAP();
- wifi.connect(WIFI_NAME, WIFI_OPTIONS,
- function(ap){
- console.log("Successful connect.");
- });
- // wait, and connect MQTT
- setTimeout(function() {
- console.log("MQTT connecting");
- mqttConnect();
- }, 10000);
- }
Code
Credits
Espruino
Espruino, Espruino Pico and Puck.js are low-power Microcontrollers that run JavaScript. Espruino is a JavaScript Interpreter for Microcontrollers that is designed to make development quick and easy. The Espruino interpreter is firmware that runs on a variety of different microcontrollers, but we also make Espruino Boards that come with the interpreter pre-installed and are the easiest devices to get started with. However Espruino itself isn't just the interpreter firmware or hardware - there's also the Web IDE, command-line tools, documentation, tutorials, and modules that form a complete solution for embedded software development.
Related products


Leave your feedback...