
Email Notifications Using Amazon Web Services

Made by gusgonnet
About the project
When the Particle Cloud meets the Amazon Cloud
Project info
Difficulty: Difficult
Platforms: Amazon Web Services, Particle
Estimated time: 1 hour
License: MIT license (MIT)
Items used in this project

Story
In this article, I'm going to explain how to send email notifications from a Particle using the Amazon Web Services.
This mechanism was originally developed for one of my projects, but since there are a lot of steps involved and they can be reused for other projects, I decided to write a separate article about it.
A Bird's-Eye View
It all starts when the Particle reads a sensor. Then It publishes some information to the Particle Cloud. From there, a webhook sends an HTTP POST request to the AWS API Gateway, which in turn calls the AWS SNS service. Finally, the AWS SNS service is configured to send an email.
Let's try to illustrate that with a picture:
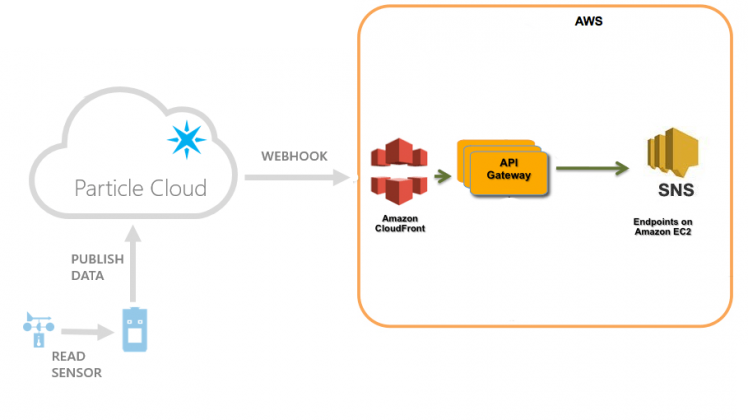 Sensor to Particle to Particle Cloud to Amazon Cloud to Amazon SNS to Email notification
Here is a list of what needs to be done in order to achieve our goal:
- a webhook in the Particle Cloud
- an API in the Amazon API Gateway
- some permissions in the Amazon IAM (Amazon Identity and Access Management)
- an SNS Topic in Amazon SNS (Amazon Simple Notification Service)
Since one depends on the other, I propose we start at the bottom and work our way up.
The Amazon Simple Notification Service
We need to follow the steps described in the Getting Started with Amazon Simple Notification Service.
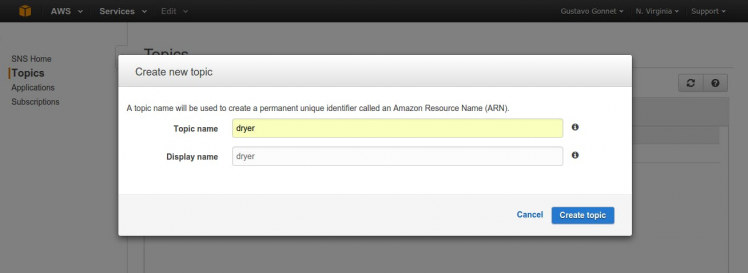
SNS STEP 1: Create the Topic
A topic is a communication channel to send messages and subscribe to notifications.
- Open the Amazon SNS console at https://console.aws.amazon.com/sns/
- Create a new topic and enter dryer both as Topic name and Display name:
 dryer topic
- Copy the topic ARN for the next step.
Example: arn:aws:sns:us-west-2:111122223333:MyTopic
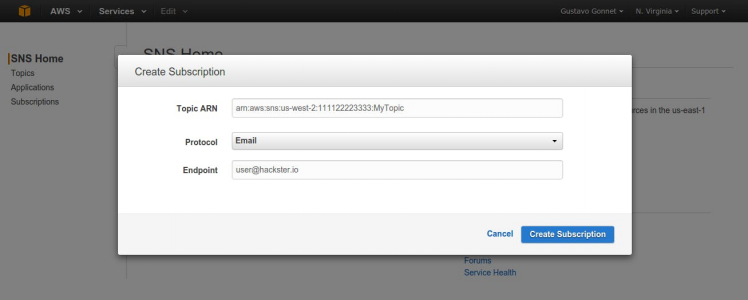
SNS STEP 2: Create a subscription
To receive messages published to a topic, you have to subscribe an endpoint to that topic. The endpoint will be our email address.
- Open the Amazon SNS console at https://console.aws.amazon.com/sns/
- Click Create subscription
- In the Topic ARN field, paste the topic ARN you created in the previous task, for example: arn:aws:sns:us-west-2:111122223333:MyTopic
- In the Protocol drop-down box, select Email
- In the Endpoint box, type an email address you can use to receive the notification
 email susbcription
Go to your email application and open the message from AWS Notifications, and then click the link to confirm your subscription.
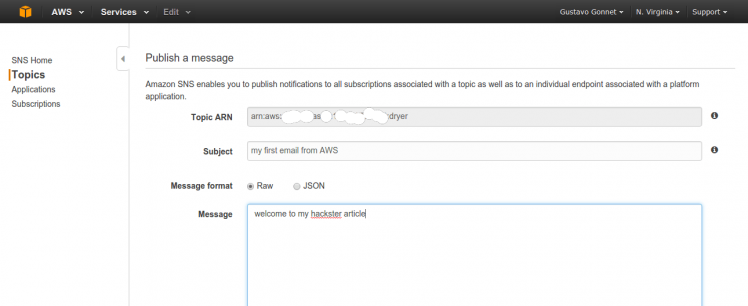
SNS STEP 3: Test your topic
By publishing to the topic you just created, you will be sending yourself an email.
- Open the Amazon SNS console at https://console.aws.amazon.com/sns/
- In the left navigation pane, click Topics and then select the topic you want to publish to
- Click the Publish to topic button
- The Publish a Message page appears
 Test your topic by publishing to it
- Hit the Publish Message button at the bottom
- you should receive an email. If not, recheck the instructions at Getting Started with Amazon Simple Notification Service.
SNS STEP 4: Grant permissions
- Open the Amazon SNS console at https://console.aws.amazon.com/sns/
- In the left navigation pane, click Topics and select the topic Dryer
- Click on the button Other Topic Actions then click on Edit Topic Policy
- Hit on Everyone and click Update Policy
I'm an not 100% sure this is the way it should be done, but it's the way I made it work. It should look like this:
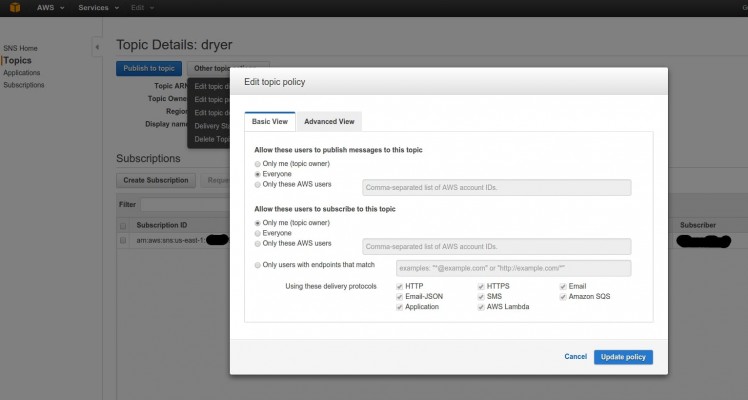 Not sure about the implications of this change, but it worked for me
The Amazon Identity and Access Management
We need to follow the steps described in the Setting up to use Amazon API Gateway.
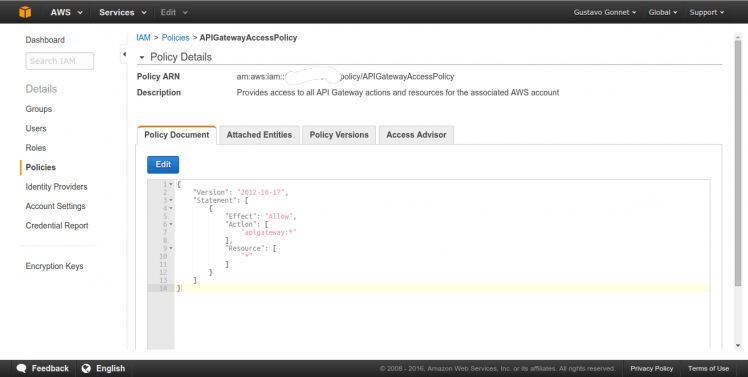
IAM STEP 1: Grant permissions
In step 3 of the mentioned guide you will create a policy to grant a IAM user permissions to use resources in the Amazon API Gateway. Make sure it looks like this:
 Allow a user to call the API
The API in the Amazon API Gateway
We need to follow the steps described in the Walkthrough: API Gateway and an AWS Service Proxy page.
API step 1: create an API
Follow Step 2 create an API here. In my case, the api is called dryer.
API step 2: create a resource
Follow Step 3 here. I have created a resource called email.
API step 3: create an Execution Role
Go to this page and create the AWS Service Proxy Execution Role. You will first create a policy so the API can call the SNS service, and then create the Execution Role.
API step 4: create a POST method
Follow this step, but select POST instead of GET.
In Integration Type, select Show advanced then AWS Service Proxy.
In AWS Region, select the region you are located.
In AWS Service, select SNS (since we want to send email notifications).
In HTTP method select POST.
In Action enter Publish.
In Execution role enter the APIGatewayAWSProxyExecRole created in the previous step.
API step 5: Deploy the API
Follow this step here to deploy your API. I entered prod for Deployment stage. Once the API is deployed we will be able to access it from the outside world, and in particular, from the Particle Cloud.
This is how my API method looks like:
 The API
API step 6: Add Query Strings on the incoming request
Query strings are the parameters we can pass after a question mark at the end of an URL. We are going to use them to send the Subject, Message (the body of the email) and the topic ARN.
Click on Method Request in blue (see picture in previous step). Then click URL Query String Parameters. Finally click on Add query string and then add the following:
- Message
- TopicArn
- Subject
It should look like this:
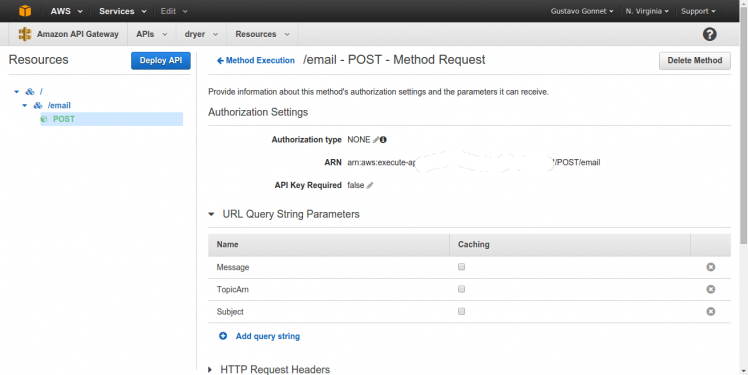 Query strings for the incoming request
API step 7: Add Query Strings on the outgoing request to SNS
We need to add the same parameters to the request going to the SNS, so the email has the subject and body we want.
Click on Integration Request, then URL Query String Parameters, then Add query string.
Add the following:
- Message, mapped from method.request.querystring.Message
- TopicArn, mapped from method.request.querystring.TopicArn
- Subject, mapped from method.request.querystring.Subject
This is how it should look like:
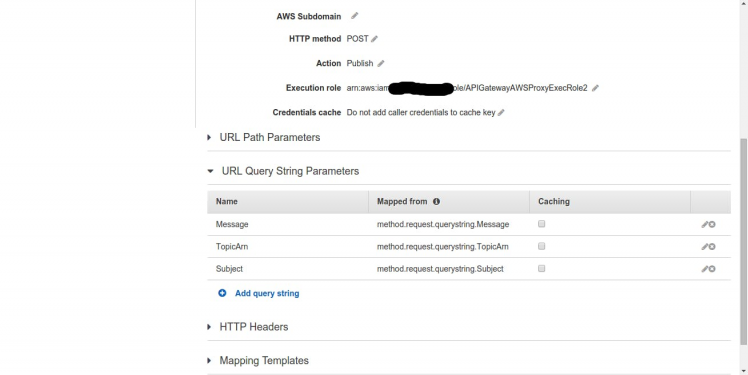 Query string on the outgoing request
NOTE: You may have noticed that I have added the subject as part of the API, but the different things I tried were not enough to make this setting work. The subject of the email was always the same: AWS Notification Message. If this is a limitation in the SNS email service or a setting I'm missing is yet to be determined.
You Amazon API is up and running. You could now send a test message from any program that can create an http POST request to try it out.
The Particle Webhook
From Particle's site:
Webhooks are a simple and flexible way for your devices to make requests to almost anything on the Internet. Webhooks listen for events from your devices. When you send a matching event, the hook will send a request to your web application with all the details!
In other words, a webhook is triggered when your Particle publishes some information.
For instance, if your Particle executes the following line of code:
Particle.publish("awsEmail", "Starting drying cycle", 60, PRIVATE);
A webhook that matches "awsEmail" would then trigger. And this is exactly what we want.
WEBHOOK STEP 1: install the Particle CLI
Since a webhook can only be configured from the Particle CLI, we need to install it by following these instructions. Once you are done with the installation only come back here.
WEBHOOK STEP 2: Populate the webhook
Copy and paste this webhook code in a file called webhookAWSemail.json:
{
  "eventName": "awsEmail",
  "url": "https://my-api-id.execute-api.region-id.amazonaws.com/prod/email",
  "requestType": "POST",
  "headers": {
    "x-api-key": "my-api-key",
    "Content-Type": "multipart/form-data; boundary=----WebKitFormBoundary7MA4YWxkTrZu0gW"
 },
  "query": {
    "Subject": "{{SPARK_EVENT_VALUE}}",
    "Message": "{{SPARK_EVENT_VALUE}}",
    "TopicArn": "my-sns-topic-arn"
  },
  "mydevices": true,
  "noDefaults": true
}
We need to replace:
- my-api-id with the api id we got from Amazon API Gateway
- region-id with the region we used when creating the API
- my-api-key from Amazon API Gateway
- my-sns-topic-arn from AMAZON SNS
Examples:
- my-api-id: bc2hjkiopo
- region-id: us-east-1
- my-api-key: jFknRFsss46JdFBsAhKDU2sdfrEwQf2G5H67Pxds
- my-sns-topic-arn: arn:aws:sns:us-east-1:123456123456:dryer
WEBHOOK STEP 3: Configure the webhook in the Particle Cloud
Open a console and type:
particle webhook create webhookAWSemail.json
If successful, the output should look like:
Using settings from the file webhookAWSemail.json
Sending webhook request { uri: 'https://api.particle.io/v1/webhooks',
method: 'POST',
json:
{ eventName: 'awsEmail',
url: 'https://my-api-id.execute-api.region-id.amazonaws.com/prod/email',
requestType: 'POST',
headers:
{ x-api-key: 'my-api-key',
'Content-Type': 'multipart/form-data' },
query: { Subject: '{{SPARK_EVENT_VALUE}}', Message: '{{SPARK_EVENT_VALUE}}', TopicArn: 'my-sns-topic-arn' },
mydevices: true,
event: 'awsEmail',
deviceid: undefined },
headers: { x-api-key: 'my-api-key' } }
Successfully created webhook with ID 1234kljhl123h41234jklh
WEBHOOK STEP 4: test your webhook
Right now we only need to trigger the webhook with an event.
In my case, I used the current mechanism to send emails from my dryer, as explained in this project.
In your case, the software running in the Particle needs to publish an event with the name awsEmail in it.
For example, this line will achieve that:
Particle.publish("awsEmail", "THIS IS THE EMAIL BODY", 60, PRIVATE);
Go ahead, try it out!
NOTE: as specified in the webhook json file, Include Default Attributes must be set to NO for this webhook integration to work.
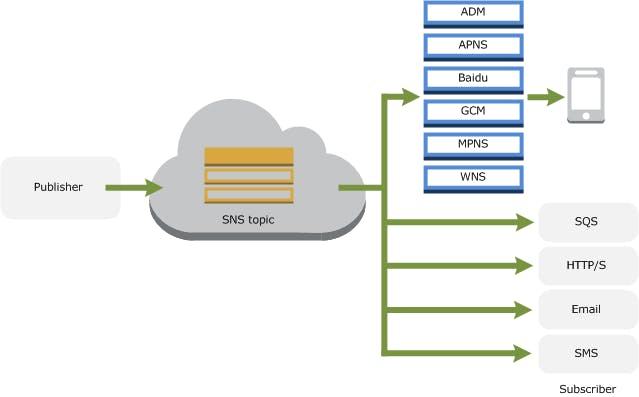
Not Only Emails
By following this article we were able to configure email notifications. You can also configure other types of notifications, like SMS, HTTP/S, Amazon Simple Queue Service (SQS), the Amazon, Google or Apple platforms and many more.
; ; 1 / 2 • Name your notification, Amazon has it
Final words
Amazon has built an incredibly powerful cloud and integrated an innumerable number of services in it. Whatever your need might be, I'm 99.9999% sure you will find how to do it with Amazon Web Services.
However, it's a rather complex beast and understanding it can take some time, so give yourself plenty of ramp up time to understand the pieces you need to use in your projects and how to connect them.
That's it for now. Feel free to write anything that crosses your mind in the comments below.
Gustavo.
Psst: please find my other projects here.
Need help?
If you require professional help with your projects, don't hesitate to write me a line about your needs at gusgonnet@gmail.com. Thank you!
Leave your feedback...