
E-paper Picture Frame By Gyro

Made by DoYouKnowArduino
About the project
I decided to make a digital picture frame with an E-ink display. The great thing about these displays is that they don't need any power to retain an image. You only need to power it in order to change the screen.
Story
Step 1: Tools and Materials
Tools:
- Soldering iron
- 3D printer (optional)
- Hand saw
- Hot glue gun
Materials:
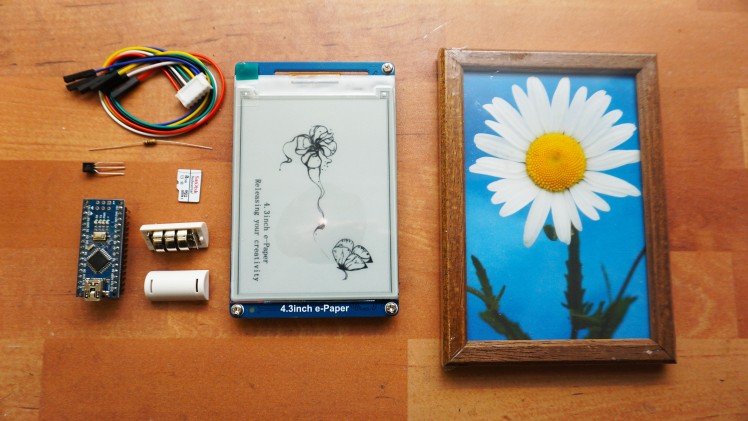
- 4.3 inch E-ink display module
- microSD card
- Button cell battery holder / 3x AAA battery holder
- arduino mini pro + USB to serial converter
- BC548 transistor
- Momentary push button
- 1k resistor
- 100k resistor
- Pref board
- picture frame 9x13cm (or similar size)
Step 2: Wiring
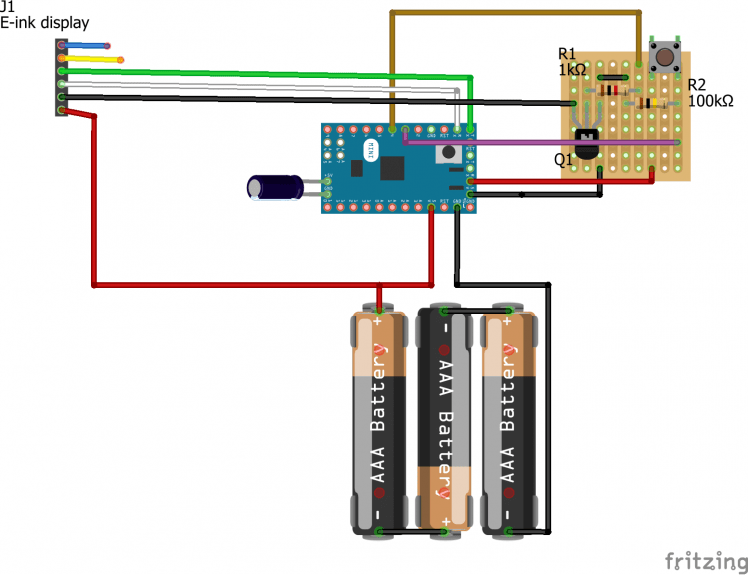
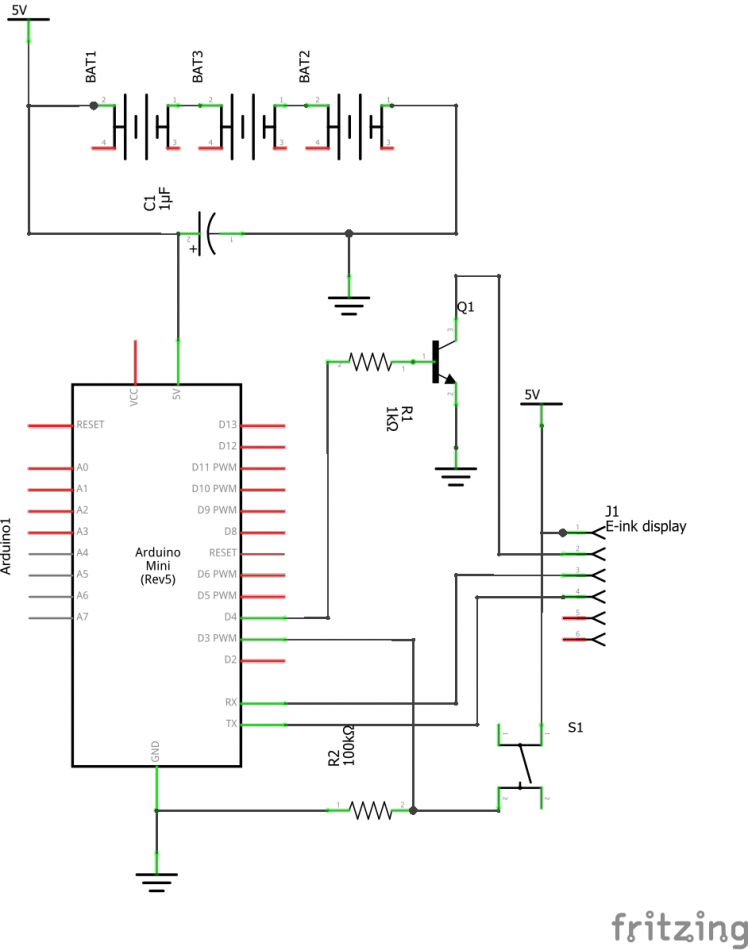
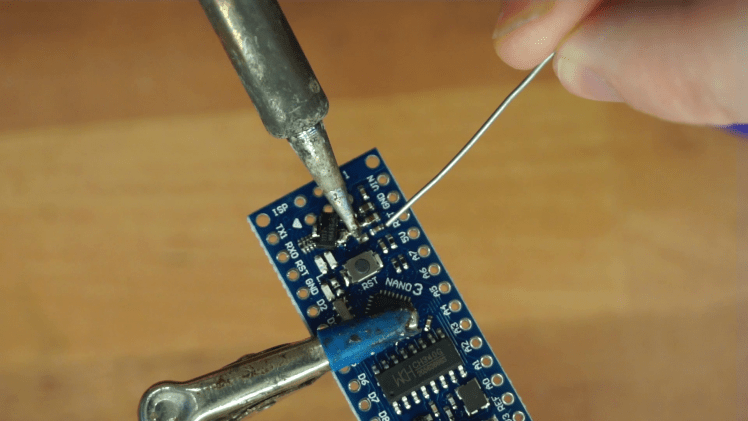
First of all, it's a good idea to just test if your components are working. Fortunately, that's quite easy to do. Simply connect the screen to your Arduino the same way as on my schematic, except for the transistor and button which you don't have to use. Simply connect the power pins directly to 5V. You can use the example sketch from epd.h library.
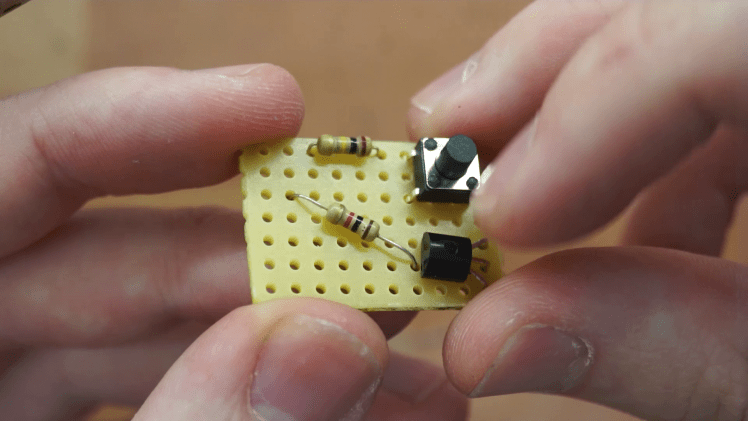
The schematic is quite simple as there is just a couple of components. However, the resistors, transistor and the button can't be just floating in mid-air. The simplest solution is to just solder them on a tiny pref-board. With this board ready they can all be laid out and wired permanently.
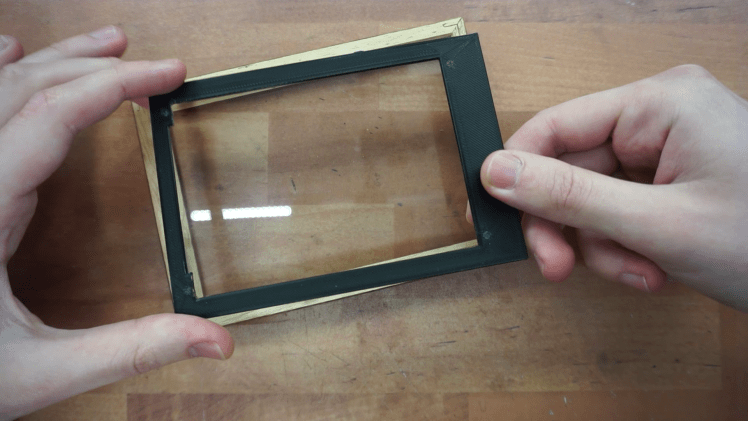
Of course, in order to lay the parts out, you need to have the picture frame ready. I chose 9x13cm picture frame which can comfortably house the display and the other electronics. Similarly sized picture frames will do the job. It's just a matter of making a cutout for the screen. If you have the same sized frame you can 3D print the back side like I did since I'm not capable of cutting a hole in a piece of hardened cardboard...
You may notice I'm using Arduino nano yet I suggest using an Arduino mini pro. You can use either one but you need to remove the power regulator and the LEDs. If you're using nano you'll also have to remove the USB to serial chip and any other unnecessary components. This is necessary otherwise your battery will be drained in a couple of days. The Arduino mini pro just doesn't have as many unnecessary components.
Once you wire everything together, tape the wires down to keep it low profile. I have also placed paper cutout between the glass the back side of the frame to hide everything except for the screen.
Step 3: Software
The software was written in Arduino 1.8.5. It requires two libraries, epd, and Arduino low power. Both of these should be in the library manager. With these two libraries installed you should be able to compile and upload the code to your Arduino. If you want to configure it there is really just one variable, refreshRate. This is the time it takes between loading pictures. By default, it's set to 10800 which is 24h. That means one unit is 8 seconds. So setting it to one, pictures will update every 8 seconds. Setting it to 2 will be 16 seconds and setting it to 10800 is 24h.
<p>#include <lowpower.h><br>#include <epd.h></epd.h></lowpower.h></p><p>const int wake_up = 6;
const int reset = 5;
const int lcd_on = 4;
const int button = 3;</p><p>int refreshRate = 10800; //time between loading images. number you enter * 8 = seconds between refresh (10800 = 24h)
int counter = 1;
int refreshCounter = 0;
int ByteReceived;
bool errorFlag = false;
bool picSend = false;
bool picLoaded = false;</p><p>void(* resetFunc) (void) = 0;</p><p>void setup(void)
{ pinMode(lcd_on,OUTPUT); pinMode(13,OUTPUT); digitalWrite(13,LOW); //LowPower.powerDown(SLEEP_8S, ADC_OFF, BOD_OFF);
}</p><p>void loop(void){ DrawPic(counter); counter++;
}</p><p>void wakeUp(){ refreshCounter++; if(refreshCounter < refreshRate) enterSleep();
}</p><p>void DrawPic(int index){ pinMode(lcd_on,OUTPUT); pinMode(13,OUTPUT); digitalWrite(13,LOW); //delay(2000); digitalWrite(lcd_on,HIGH); delay(300); epd_init(wake_up, reset); epd_wakeup(wake_up); epd_set_memory(MEM_TF); epd_clear(); digitalWrite(13,HIGH);</p><p> //int index = 7; String indexStr = String(counter); String str = 'i' + indexStr + ".BMP "; char character[str.length()] ; str.toCharArray(character, str.length()); epd_disp_bitmap(character, 0, 0); epd_udpate(); epd_enter_stopmode(); while(1){ ByteReceived = Serial.read(); if(ByteReceived == 13){ picSend= true; } if(ByteReceived == 69){ errorFlag= true; //if(!picSend && counter == 1) noSDcard(); //if(picSend && counter == 1) noPic(); //resetFunc(); counter = 0; //Serial.flush(); break; } if(ByteReceived == 75 && picSend && picLoaded){ break; } if(ByteReceived == 75 && picSend){ picLoaded = true; } } digitalWrite(13,LOW); digitalWrite(lcd_on,LOW); picLoaded = false; errorFlag= false; picSend= false; refreshCounter = 0; enterSleep();
}</p><p>void noSDcard(){ epd_wakeup(wake_up); //delay(5000); epd_clear(); epd_set_ch_font(GBK32); epd_set_en_font(ASCII32); epd_disp_string("Can't find SD card", 0, 300); epd_udpate(); delay(10000);
}</p><p>void noPic(){ epd_wakeup(wake_up); //delay(5000); epd_clear(); epd_set_ch_font(GBK32); epd_set_en_font(ASCII32); epd_disp_string("Can't find this picture", 0, 300); epd_udpate(); delay(10000);
}</p><p>void enterSleep(){ attachInterrupt(1, wakeUp, RISING); LowPower.powerDown(SLEEP_8S, ADC_OFF, BOD_OFF); wakeUp(); detachInterrupt(1);
}</p>
Step 4: Preparing Photos
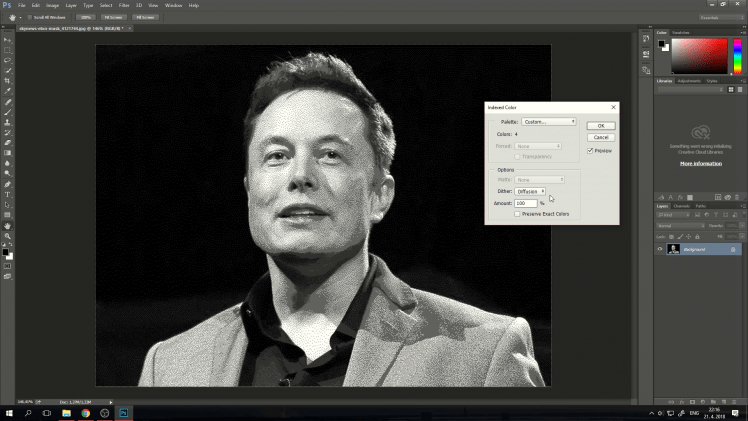
The screen has a resolution of 800x600 and 4 colors, black, white, and two shades of grey. The screen also has a card reader which we'll be using. Simply uploading pictures on the card won't do the job however. The display only supports BMP files and the smaller the file size the faster it'll be loaded which will save a lot of battery.
Fortunately, all of these problems can be solved with just a single program. Adobe Photoshop. I understand that not everyone has the program but you can always use GIMP or paint. But I'll be showing you how to do all of this in photoshop only.
I would suggest watching the video for this one as it's a lot more descriptive. Basically, start by dragging the image to PS. Go to Image -> image size. Make sure units are pixels and set the height to 600. Width will be changed automatically. If the width is not 800 you'll need to remove the sides of the image to get the correct resolution. Go to Image -> canvas size. Set units to pixels again and set the width to 800. Press OK and then Proceed. Your Image should now be the correct size.
The images usually look a bit darker on the E-ink screen so it's a good idea to turn the brightness up a bit. Click on the moon icon (circle with black and white halves) in the bottom right-hand corner and choose Brightness/Contrast. I usually set the brightness to 30 but you can play with it of course. Next, we'll change it to the 4 colors so that we can preview what it'll look like. Go to Image -> Mode -> Indexed Color... . If it asks you to flatten layers click OK. In the palette choose Local(adaptive). In Colors put 4 and click OK. Next go to Image -> Mode -> Color Table. You should see your 4 colors. Set the one on the left on to black and the one on the right to white. The two between should be shades of gray. Select OK. Next go to File -> Save as. Select BMP as type.
The name of the file should be iX.BMP where X is a number of the picture. if it's the first one you'll name it i1 and hit save .BMP will be added automatically. twenty-sixth picture would be i26.BMP etc. Once you hit save you'll be presented with BMP options. Change depth to 4 Bit and hit OK.
Make sure your microSD card is formatted to FAT32 format. The card should be empty and you can just copy your pictures in. As mentioned they should be named from i1 to i150 or whatever number is your last image. If you'll be missing a number, for example, you'll have i21.BMP and then i23.BMP the i23 and beyond will never be loaded as it will go back to 1 after 21.
Step 5: Done

With the images loaded, you can just insert the memory card and put the batteries in. The first image should be loaded after a couple of seconds and will be updated every 24 hours. Despite only four colors, the images look truly spectacular. The resolution is really high for such a small screen and the adaptive color diffusion makes it look like there are at least 50 shades of gray.
Needless to say, I'm very pleased with the result. This is something I'm keeping on my desk. Please check out the video as well for more info and huge thanks to dfrobot.com for providing the parts for free. If you have any questions just leave them here or tweet @Gyro_youtube
Credits
DoYouKnowArduino
Offering quality microcontroller, shield, sensors, electronic components, iot gateway/node and robot kit with arduino, lattepanda, raspberry pi and intel edison/cuire/joule.
Related products


Leave your feedback...