
Connect To Node App From Raspberry Pi Pico W

Made by mahmood-m-shilleh
About the project
Learn how to easily connect a microcontroller to NodeJS using MQTT to start making powerful IoT applications.
Project info
Difficulty: Moderate
Platforms: Raspberry Pi, MicroPython
Estimated time: 1 hour
License: GNU General Public License, version 3 or later (GPL3+)
Items used in this project
Hardware components

Story
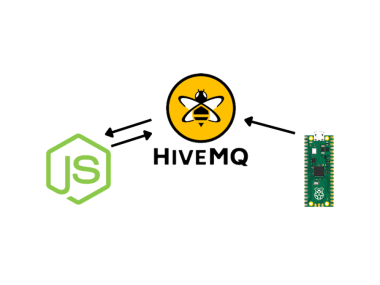
This tutorial demonstrates how to start your IoT applications with your Raspberry Pi Pico W. I demonstrate how to get HiveMQ setup as an MQTT broker and use it to connect your microcontroller to your NodeJS backend. This is a very simple way to start getting data securely in real-time. HiveMQ is great because it is free and scalable, as are many other MQTT brokers. You may be asking what is MQTT...
MQTT (Message Queuing Telemetry Transport) is a lightweight, publish-subscribe messaging protocol designed for use on low-bandwidth, high-latency networks. It is particularly useful for connections with remote locations where a small code footprint is required, or the network bandwidth is limited. MQTT uses a publish-subscribe model, where clients connect to a broker and subscribe to topics to receive messages. Clients can also publish messages to the broker, which then forwards them to all clients subscribed to the relevant topic. This allows for efficient communication and the decoupling of devices and applications. It is favorable in IoT systems because it makes the handling of multiple devices efficient, easy, and secure.
This should ideally set you up to start developing full-scale IoT applications with Raspberry Pi Pico W and this work can be translated to any microcontroller and sensor suite. You will still learn something if you are using another controller, so I recommend reading if you want to learn some IoT architecture.
Once you are done you will be able to process real-time data in your backend.
Note that although I use the MPU6050, in reality, you can use any sensor/sensors to send information to the MQTT broker. You can even send regular messages it does not have to be sensor-specific. Still follow the tutorial if you are not using any sensors.
If you do find this useful please like comment and subscribe:Step 1: Setup HIVEMQ Account1-) Go to hivemq.com and create a free account here, step through the account creation. You should receive the URL of your cluster. This will be the hostname for the remainder of the tutorial.
2-) Create a user in Access Management, and save the user and password. You will need this to publish information from the Pico W
HiveMQ gives you 10 GB of free storage, more than enough to start testing and you do not need any credit card information which is nice. Seems too good to be true.
Step 2: MicroPython Code#Native libs
from machine import Pin, I2C
import network
import time
from time import sleep
#Third Party
from imu import MPU6050
from umqtt.simple import MQTTClient
# Internal libs
import constants
def connectMQTT():
'''Connects to Broker'''
# Client ID can be anything
client = MQTTClient(
client_id=b"mahmood",
server=constants.SERVER_HOSTNAME,
port=0,
user=constants.USER,
password=constants.PASSWORD,
keepalive=7200,
ssl=True,
ssl_params={'server_hostname': constants.SERVER_HOSTNAME}
)
client.connect()
return client
def connect_to_internet(ssid, password):
# Pass in string arguments for ssid and password
# Just making our internet connection
wlan = network.WLAN(network.STA_IF)
wlan.active(True)
wlan.connect(ssid, password)
# Wait for connect or fail
max_wait = 10
while max_wait > 0:
if wlan.status() < 0 or wlan.status() >= 3:
break
max_wait -= 1
print('waiting for connection...')
time.sleep(1)
# Handle connection error
if wlan.status() != 3:
print(wlan.status())
raise RuntimeError('network connection failed')
else:
print('connected')
print(wlan.status())
status = wlan.ifconfig()
# Connect to internet and set MPU to start taking readings
connect_to_internet(constants.INTERNET_NAME, constants.INTERNET_PASSWORD)
i2c = I2C(0, sda=Pin(0), scl=Pin(1), freq=400000)
imu = MPU6050(i2c)
client = connectMQTT()
def publish(topic, value):
'''Sends data to the broker'''
print(topic)
print(value)
client.publish(topic, value)
print("Publish Done")
while True:
ax = round(imu.accel.x, 3)
ay = round(imu.accel.y, 3)
az = round(imu.accel.z, 3)
gx = round(imu.gyro.x, 3)
gy = round(imu.gyro.y, 3)
gz = round(imu.gyro.z, 3)
tem = round(imu.temperature, 3)
# Publish to broker
publish('picow/ax', str(ax))
publish('picow/ay', str(ay))
publish('picow/az', str(az))
publish('picow/gx', str(gx))
publish('picow/gy', str(gy))
publish('picow/gz', str(gz))
publish('picow/tem', str(tem))
print("ax",ax,"t","ay",ay,"t","az",az,"t","gx",gx,"t","gy",gy,"t","gz",gz,"t","Temperature",tem," ",end="r")
sleep(1)Run this code on any file on your Pico W.
Let me explain this code:
1-) Imports:
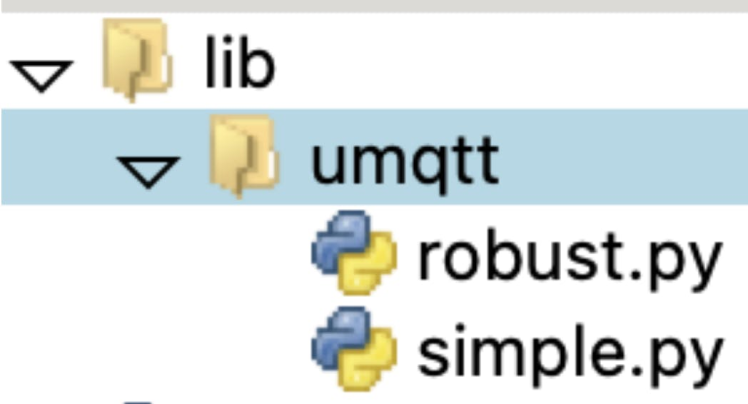
Most of the imports are standard here but I import from the umqtt library which is a 3rd party library. To do this you need to create a directory called lib with a subdirectory called umqtt (lib > umqtt). I tried to install it through the package manager on the Thonny IDE but it kept giving me errors. Copy the two files listed into the umqtt directory you created so your main script can find the library code:
You will need these to use MQTT functionality on the Pico W.
I also import my constants from another file I have, you do not need to do this. I am just hiding secure information.
2-) connectMQTT()
Connects to the broker that you created when you created your HiveMQ account. Pass in the HiveMQ server URL and the user and password you set up. client_id can be anything, just make sure different machines (the Pico and your Node Server) have different names when subscribing to the client.
3-) connect_to_internet()
Connects you to your internet, just pass in your internet name and password
4-) publish()
Publishes data to the broker in real-time, this is the data NodeJS will be accessing. You need to pass a "topic"; you can get creative and set on your own, this is essentially your own label for the data. I label "ax" for acceleration in the x direction and so on...
------------------------------------
The remainder of the code is MPU6050 related. If you want to get that setup or want to understand more about that please see my Youtube Channel. Oh, you can subscribe as well ;)
You should be able to run this code (modify it if you are not using the MPU 6050) if you followed this tutorial properly so far and you have your Raspberry Pi environment set up properly.
*** Here is the dir structure for the library code that you will need to copy into your MicroPython environment.
For the sake of this tutorial, I imagine you have a server already running on NodeJS, so I will not demonstrate how to start a NodeJS app from scratch. Note that I was able to do this with a barebones NodeJS server. You can find quick tutorials online on how to set up a simple NodeJS backend.
In my index.js file (you can do this in other services or files on your server) I included the following snippet of code:
const dotenv = require('dotenv');
dotenv.config();
const MQTT = require('mqtt')


const HOST = process.env.SERVERHOSTNAME
const PORT = 0
const CLIENTID = `mpu_6050_test`
const CONNECTURL = `mqtts://${HOST}:${PORT}`
const TOPIC = 'picow/ax'


const client = MQTT.connect(CONNECTURL, {
    CLIENTID,
    clean: true,
    connectTimeout: 7200,
    username: process.env.EMAIL,
    password: process.env.PASSWORD,
    reconnectPeriod: 10000,
})


client.on("error",function(error){ console.log("Can't connect"+error)})


client.on('connect', async () => {
  console.log('Connected')
  client.subscribe([TOPIC], () => {
    console.log(`Subscribe to TOPIC '${TOPIC}'`)
  })
})


client.on('message', (TOPIC, payload) => {
    console.log('Received Message:', TOPIC, payload.toString())
})
You need to: npm install mqtt
I also use dotenv to access my constants, once again, you can just hardcode your constants if you like.
Once you pass in the corresponding information to your HOST (MQTT Server URL), and other information accordingly. Pick a CLIENTID for your NodeJS server, this can once again be random. Make sure to select a TOPIC you created in your MicroPython code. I am using one topic for simplicity but you can subscribe to all of the topics. Subscribing just means reading that specific data stream from the MQTT broker. This subscription model is nice because it provides you with a lot of flexibility when designing your applications, hence why I encourage you guys/gals to use MQTT in your IoT applications.
You should be able to npm run the server and see that a connection has been made (the console log will show you). If not please check that there are no typos in your credentials. We use the mqtts:// protocol here.
If your Raspberry Pi Pico W is publishing data to the topic, and your NodeJS app is connected to the broker and simultaneously running, you will be able to see data in real time in your console log! I show a snippet of my "ax" data from the topic "picow/ax" which I created in my MicroPython script. You can see I am getting the data quickly in real-time. You can see this better in my Youtube Video. As I move my accelerometer I see the values change, that is pretty darn cool!
That is it! You did it. This will hopefully form the backend of your IoT adventures or help you get an idea of how to get a full-scale IoT application running. You can get creative from here. See if you can visualize the data in the front end by developing your own Angular or React App. There are many ways you can go about this. Best of luck!
Any questions? Let me know. If this helped, subscribe to the Youtube channel and leave a like here as well. Thanks for reading y'all hope I made your life a little easier.
Credits
mahmood-m-shilleh
Mechanical and Software Engineering Background. University at Buffalo 2019 Texas A&M 2021 I make data pipelines for my day job. Outside of work, I participate in online communities regarding Full Stack Engineering, Microelectronics, and more. You can find more details about me on my Youtube Channel. https://www.youtube.com/@mmshilleh Feel free to reach out!
Related products


Leave your feedback...