
Connect Bme280 To Seeed Studio Xiao Rp2040

Made by mahmood-m-shilleh
About the project
Get Temperature, Humidity, and Pressure values from the BME280 sensor using the Xiao RP2040.
Project info
Difficulty: Easy
Platforms: MicroPython
Estimated time: 1 hour
License: GNU General Public License, version 3 or later (GPL3+)
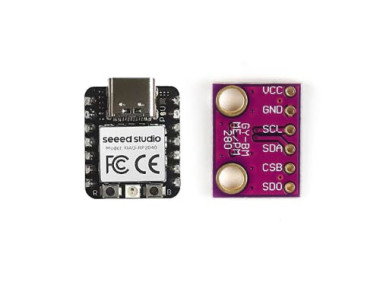
Items used in this project

Story
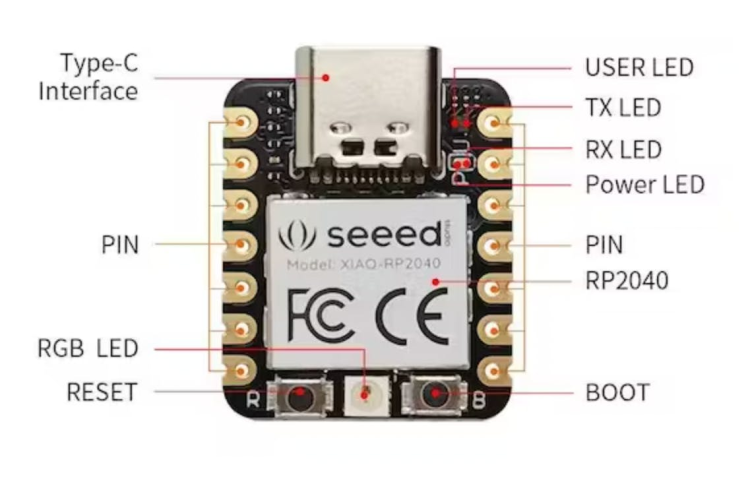
The Xiao Seeed Studio RP2040 is a powerful microcontroller board based on the RP2040 chip, which features a dual-core Arm Cortex-M0+ processor and a wealth of peripherals. The board is highly versatile and can be used for a wide range of applications, including sensor monitoring and data logging. One such sensor is the BME280, a popular environmental sensor that measures temperature, humidity, and barometric pressure.
In this tutorial, we will guide you through the process of connecting the BME280 sensor to the Xiao Seeed Studio RP2040 and reading its data using the I2C protocol. By the end of this tutorial, you will have a basic understanding of how to interface with sensors using the RP2040 microcontroller and how to use the BME280 sensor to collect environmental data. So, let's get started!
Before getting started, please consider subscribing or supporting channel by donating in the link down below to allow us to produce more content!
Subscribe:
Support:
https://www.buymeacoffee.com/mmshilleh
Step 1-) Gather ComponentsStep 2-) Make a Connection
Utilize 4 jumper wires to connect the device as shown.
Step 3-) Download MicroPython on RP2040Download Thonny:
Go through the installation process and open Thonny.
Plugin RP2040, but before you plug in your RP2040 to your computer, hold the "boot" button (shown below) on the device as you plug in the USB-C.
We’re going to install MicroPython, so once plugged in, you need to click Tools in the menu above and go to Interpreter. Click install on the bottom right, and select the target volume and the variant you would like, the Pico H variant is fine for this tutorial. Should be installed after you click Install.
You can now select the device from the bottom right of the screen in Thonny to start creating files!
Step 4-) Install BME280 LibraryGo to Tools > Manage Packages, and download the micropython-bme280 library
Step 5-) Run the following codefrom machine import Pin, I2C #importing relevant modules & classes
from time import sleep
import bme280 #importing BME280 library
i2c=I2C(1,sda=Pin(6), scl=Pin(7), freq=400000) #initializing the I2C method
while True:
bme = bme280.BME280(i2c=i2c) #BME280 object created
print(bme.values)
sleep(1) #delay of 10sSave the code onto a file on your device and run to get values! Should work if everything is set up correctly.
ConclusionDo not forget to like, comment, and subscribe to the channel. Hope you got your components set up easily and are ready to start working on your projects.
Credits
mahmood-m-shilleh
Mechanical and Software Engineering Background. University at Buffalo 2019 Texas A&M 2021 I make data pipelines for my day job. Outside of work, I participate in online communities regarding Full Stack Engineering, Microelectronics, and more. You can find more details about me on my Youtube Channel. https://www.youtube.com/@mmshilleh Feel free to reach out!
Related products


Leave your feedback...