
Building a Smart Helmet with the Blues Wireless Notecard

Made by ujjval-rathod
About the project
A smart helmet which can track the user location and detect a fall using a MPU6050 IMU based fall detector
Project info
Items used in this project
Hardware components

View all
Story
We are living in the age of digitization and smart IoT devices. With advances in technology in the last few years it is even more important that we use those technologies in an effective manner. Human and worker safety is one important topic. While riding a bike, a car, or working at a factory, almost everyone of us is at a risk of accidents to some extent. When someone is either working in a remote area or is on their own it may be necessary to keep watch and be informed about their location as well as their status using sensor data.
For safety reasons fall detection and alerting after one has fallen is an important thing to monitor. If a person can move after a fall is detected with the sensor attached to the "Smart Helmet", this can mean that the person is safe. If one is not moving then they would need emergency medical help at the location where one has fallen.
In these mentioned scenarios, a alert based system with a cloud dashboard can be created. Emergency service team can be informed via SMS or other similar alert systems about the user's accurate location and other information. This centralised system can revolutionise the way people drive, work or travel.
The map based cloud services not only provide location, but also provides geo-location features that can send an alert to someone if they enters an accident prone area.
For these reasons I have created the "Smart Helmet" project.
For creating a smart helmet that has tracking capability, you must have GPS plus some connectivity options, so that the GPS and sensor data can be sent to the cloud for nice visualizations.
With Blues Wireless's products such as cellular/wifi Notecard and the companion boars such as Notecarriers, Blues Swan (feather based STM32 board), and their cloud service Notehub.io, makes it easy even for newbies to IoT to create a tracker and an online dashboard.
In the following write up I will discuss what I have done to create a sensor-based smart helmet with GPS/Cellular connectivity. The smart helmet can monitor movements, free fall detection, temperature, current location of the user and other sensor data from remote locations.
Creating Free Fall detectionFor creating a smart helmet with fall detection and an alerting system it was necessary to create a working fall detector. I used MPU6050 sensor from invensense. It has built-in fall detection support which can trigger interrupts on the host MCU to alert the user. I have created a simple sketch which can detect and turn-on the LED for the user to indicate free fall detection.
The setup in the picture is a swan based fall detector with an LED that turns ON for some seconds to indicate a free fall-detection.The following open-source library on Gitlab was created by me to interface with a MPU6050 sensor over I2C interface.
Connections(Sensor to Swan)
SCL --> SCLSDA --> SDAINT --> D5GND --> GNDVCC --> 3.3V
There are simple functions in the library such as
enablefreefall(uint8_t threshold, uint8_t duration);
disabefreefall();
This code enable free fall detection within a given threshold value and duration for the threshold values. For this experiment setting the threshold value to 0xD0 was a little more sensitive than expected to detect a free-fall. One can tune this value to see which works perfectly for their needs.
Values for free-fall threshold such as 0xFF were quite sensitive - just touching the sensor would trigger the interrupt. So tune this to your requirements!.Image-1 Swan feather connected to sensor with LED to indicate free-fall detection

Image-1 Swan feather connected to sensor with LED to indicate free-fall detection
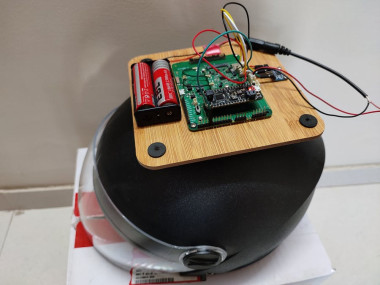
Introduction to the HardwareFor this project, I am using the hardware as shown in the image below. The list is also in the project requirements.
The hardware consists of a Cellular or WiFi Notecard, the Swan feather board from Blues Wireless, a Notecarrier-AF, a SIM card from Airtel/Monogoto etc, Two 18650 batteries (3.7V Li-Po, 2300mAh each), and connectors such as JST, Grove and Qwiic.
Image-2 Hardware

Image-2 Hardware
The cellular Notecard comes with a high-performance cellular and GNSS Quectel module for connectivity and GPS. It has ultra-low power ARM Cortex-M4 CPU, an Accelerometer and temperature sensor, andan embedded sim with pre-provisioned network access.
The notecard comes with an M.2 edge connector to connect it with companion boarda such as the Notecarrier-AF. The u.FL Antenna connectors must be used to connect the main and GPS signals on the two boards.
Notecard features

Notecard features
Programming The Blues NotecardThere are various options for programming the notecard devices. The blues website has documentation and libraries for platforms such as Arduino, Python/MicroPython, C++ API, JSON API etc.
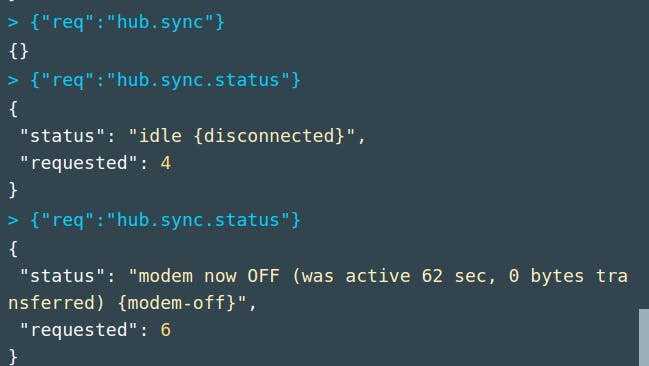
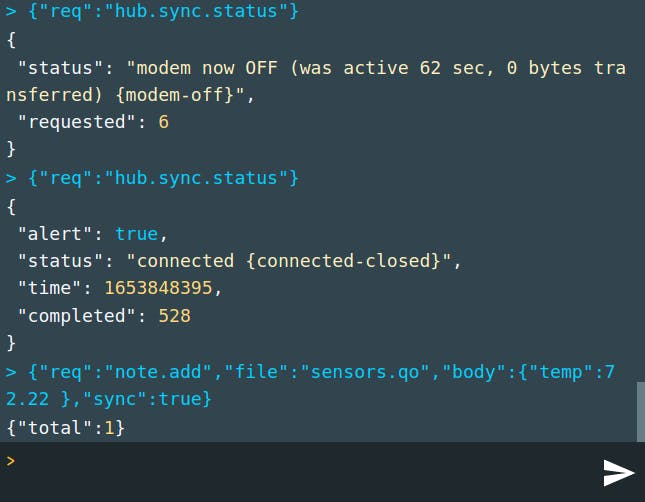
The simplest way to get started with the notecard is to use the JSON API. After connecting the Notecard to the Notecarrier you can connect your computer via USB. Next go to the Blues developer website in Google Chrome and click on the connect button on the right hand side of the screen, which will connect with the Notecard after selecting the specific USB port such as /dev/ttyACM0.
There are several requests you can send to the Notecard. If you are new check the card requests and quick start.
Serial Termial connection with web browser

Serial Termial connection with web browser
The following screenshot shows some of the common request and response from the notecard Json Api.
1 / 4 • Notecard Request & Response

Notecard Request & Response

Blues Wireless also has an Arduino library to program the Notecard via Arduino compatible boards. You will connect the to the Notecard via I2C(0x17) or via serial interface to send JSON requests and responses.
GiF to install Arduino library Credits: Blues Wireless Github page

GiF to install Arduino library Credits: Blues Wireless Github page
For example, the following is a simple sketch to send the Arduino request to setup the project, set the Notecard's GPS mode to either continuous, periodic etc, and get Notecard's location and time information every 5 seconds.
#include <Wire.h>
#include <Notecard.h>

#define serialDebug SerialU
#define productUID "UID"

Notecard notecard;

void setup()
{
  Serial.begin(9600);
  serialDebug.begin(9600);
  Wire.begin();
  notecard.begin(0x17);
  notecard.setDebugOutputStream(serialDebug);

  J *req = notecard.newRequest("hub.set");
  JAddStringToObject(req, "product", productUID);
  JAddStringToObject(req, "mode", "periodic");
  notecard.sendRequest(req);
  delay(1000);

  J *req1 = notecard.newRequest("card.location.mode");
  JAddStringToObject(req1, "mode", "continuous");
  notecard.sendRequest(req1);

  delay(100);
}

void loop()
{
    J *locationreq = notecard.requestAndResponse(notecard.newRequest("card.loc           ation"));

  if(locationreq != NULL)
  {
    lat = JGetNumber(locationreq, "lat");
    lon = JGetNumber(locationreq, "lon");
    Serial.println(lat);
    Serial.println(lon);
  }
    J *timereq = notecard.requestAndResponse(notecard.newRequest("card.time"));
delay(5000);
}
For this project, I created a sketch which does the following tasks.
(Sketch in the attachment..)
- Sets-up the project with a UID and different modes to connect to the Notehub and the correct mode to turn-on GPS in continuous or periodic mode.
- Creates an Interrupt and defines an ISR (Interrupt Service Routine) on the Swan feather board if the MPU6050 sensor detects a fall.
- Sends the location data, sensor data and status information along with creating a notefile(.qo file) to the Notehub cloud.
card.time request also provides the coordinates of the connected cell tower.Notehub.io cloud serviceNotehub.io is the official cloud platform from the Blues Wireless where you can send data directly from your Notecard devices.
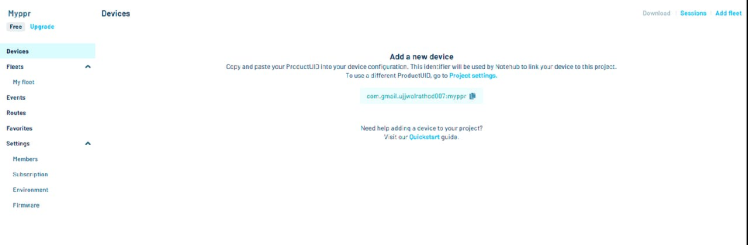
You can start by creating an account at Notehub. After creating an account it is possible to create a project by clicking the +Create Project button. In the next window provide a name of your project and a unique ProjectUID will be generated. It is necessary to make note of this UID as it will be used by Notecard devices to link them to a specific project.
1 / 2 • Project view in Notehub

Project view in Notehub
Once the project is created there will be number sections on the left hand side of the window named such as Events, Routes, Fleets etc also with subsections. The next paragraph explains how to create a route.
Notehub has a Routes section for creating routes. The routes are for creating devices and routing data from Notehub to external APIs or services such as REST APIs. Or for the case of my project Thinger.io.
To create a Route, click on the Create Route button as shown in the following image.
Route creation

Route creation
Once the window opens select the General HTTP/HTTPS Request/Response route.
Creating HTTP Route

Creating HTTP Route
In the next window name your route and select the URL of the generated route in the URL section. For my case I set the route to Thinger.io.
To create the route to a thinger.io device, you first need to go to the thinger.io platform. After logging in to the platform, you can create a device by naming Device ID and selecting device type such as HTTP Device(Sigfox, LoRa, cURL) as shown in the image below.
Creating Thinger.io device

Creating Thinger.io device
The next window will show a map and parameters such as data transfers. They will be all set to default and data values, and live transmission will be all zero as we still need to configure Notehub to send the device data to the Thinger.io.
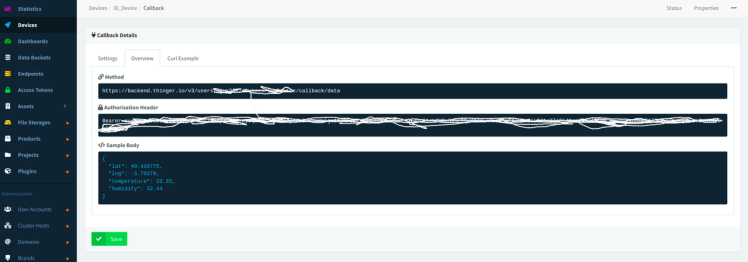
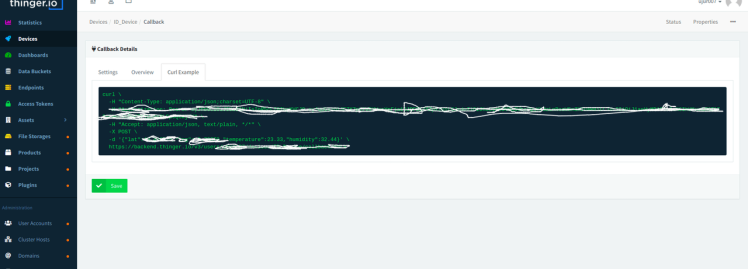
Our task is to create a HTTP route, hence start by clicking the three dots icon on the top right corner as shown in the image below and selecting the callback window.
Device view

Device view
In the window that appears there are multiple check boxes with named like Write Bucket, Authorisation, Timeout, Response Data, Select Device Property etc.
Check the box on Authorisation and a new token will appear. This token will be used by Notehub to send data to Thinger.io via an HTTP POST request.
Note that the HTTP request needs to be manually coded by the user in our case. The following coding scheme is used to create the URL we need to use at Notehub for creating a route to Thinger.io.
REST API + ?authorization= + TokenThe Callback overview section provides details of each field used in this request.
1 / 3 • Creating callback in HTTP device at Thinger.io

Creating callback in HTTP device at Thinger.io
1 / 2 • Route in Notehub.

Route in Notehub.

Now it is time to go back to Notehub.io where a codified URL needs to be copied. After copying the URL you need to select the required notefiles and codify the JSON data to sent to the thinger.io. JSON is the only accepted format by the cloud platform.
In the Notefiles section select the Notefiles by clicking on selected notefiles and then check the box of the Notefile which is being sent by the Notecard, i.e. sensors.qo, sensor.qo data.qo.
In the Transform Data section select the JSONata Expression and insert a JSON expression in the text area. This contains the information you need to route to the third-party cloud. The example JSON could be like the following
{
    "temp":body.Temp,
    "latitude":body.Latitude,
    "longitude":body.Longitude,
    "falldetection":body.Falldetection,
    "fallcount":body.Count,
    "time":when
}
Do not forget to save the changes...!!
Once the Thinger.io server can receive the data it can be used for further processing such as displaying on the dashboard, storing in a bucket, etc.
Note that the public(free version) of the thinger.io platform only supports one write per minute at maximum. So you can code your device accordingly if you plan to use the free version.
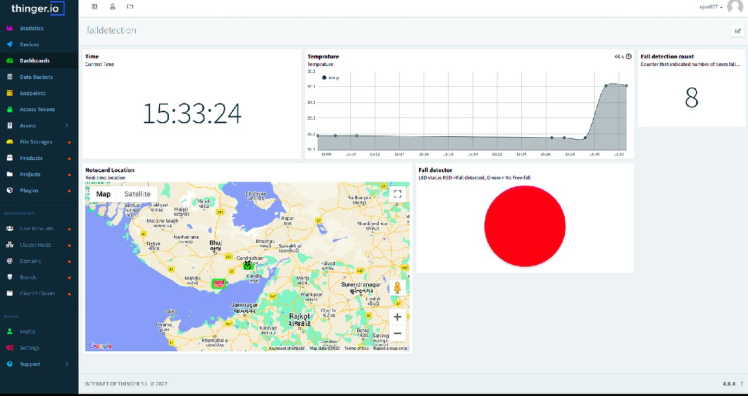
Thinger.io IoT dashboardThinger.io is an open-source cloud platform which has many features. One can create a dashboard consisting of sensor data visualization, Google Maps, switches, Buttons etc. It has a Rest-API-based HTTP request and response features which makes it possible to route the data from Notehub.io through to Thinger.io. At Thinger the data coming from a device can directly visualized or stored in a bucket for latter or be displayed on a dashboard.
For this project I have created an HTTP Device from the Devices menu (explained above). Then I created a dashboard which contains the following things.
- A Google Map,
- A Counter to display the number of times fall detection was detected on the device,
- A fall detection Indicator with LED type,
- A clock to display time
- A time-series graph of temperature values.
- A voltage value
- The Notecard's orientation & fall detection value
The images below shows how the actual dashboard looks like at Thinger.io.
The second image below is of the dashboard where a fall was recently detected on the device. Because of the recent fall, LED's status has turned Red, and the number of times it is detected since the device was last booted is eight, as indicated on the right-hand side.
After some time, the LED will automatically turn Green if no new free-fall is detected on the device.
1 / 2 • Dashboard view in Thinger.io

Dashboard view in Thinger.io
Geofencing is one of the powerful features provided by cloud platforms. This can help you know when a user has crossed a certain boundary, or needs constant monitoring because they are in a risky area. In this case, both Thinger.io and Blues Wireless Notecard provides geofencing features.
For this project, I preferred the geofencing feature provided by the Thinger.io platform. The fencing can be added from the devices menu inside the Thinger platform.
The fencing provides the possibility to trigger an endpoint that can send an alert. And it can send an alert in the case when the location of the device moves inside, outside, stays inside or stays outside a given geofencing boundary.
An Endpoint is something that triggers the alert. There are email, HTTP, Telegram and other kinds of endpoints provided the Thinger platform. The device itself can trigger the endpoint if it is supported by the Thinger platform such as ESP32 feather wing etc.
For Thinger's built-in Geofencing to work the location data sent by the device must be is named "latitude" and "longitude". The cloud will automatically use this data for fencing and endpoints.Geofencing in Thinger.io

Geofencing in Thinger.io
For this project, I am using an email type of endpoint which can be triggered as required by geo-fencings. The endpoint can be added from the endpoints sections as shown in the following image. Any Thinger device/bucket data to send in email body must be enclosed in double brackets. For example, temperature values must be formatted as {{temperature}}. Similarly, latitude and longitude must be formatted as {{latitude}} and {{longitude}}, respectively.
I used this fact to create a location URL for google maps. The maps from Google have a unique URL for each location where just the latitude, longitude and zoom level changes. This fact can be used to send a unique URL in your email body.
Endpoint in Thinger.io

Endpoint in Thinger.io
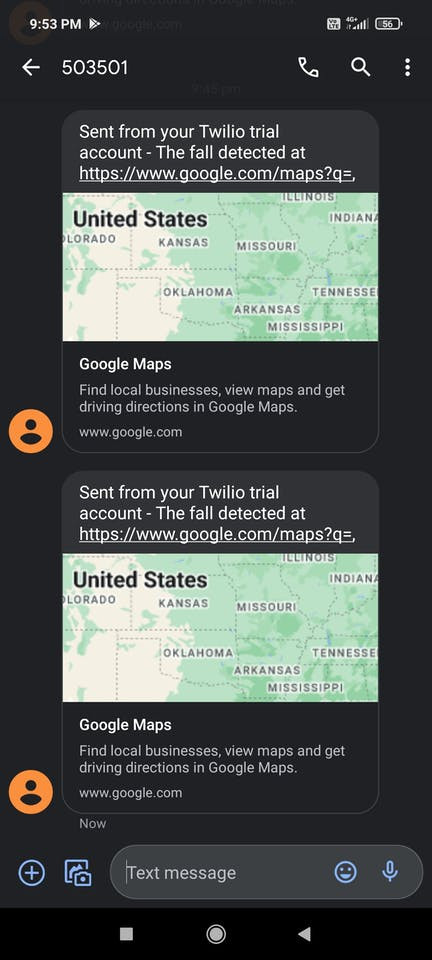
Sending SMS via Twilio.comThe ability to send SMS messages for an interesting event is another option you can explore. Thinger.io provides endpoints as explained in the previous section. but only supported devices can use the Thinger library to trigger the endpoints directly from the device itself.
Hence, I thought of creating and sending Twilio SMS to the device. The Blues has an interesting guide for Twilio setup. I have followed the same guide to create a Route and send an SMS to my number from free twilio number.
The following is a screenshot of SMS which is received with google maps link when a free-fall was detected.
The Blues Wireless Notecards are tiny devices that has both cellular and GPS connections. The device is ultra-low power capable and the libraries/APIs from Blues make it really easy for anyone to get started and develop prototypes.
This project with helmet and tracking capabilities has been in my head for a long time. I was looking for a possible and effective solution. Blues Wireless made it really easy to create the project.
Apart from the things I've already discussed in this project, you may also want to add a mobile application, SMS--based alerts, endpoint--based alert, and potentially many other things.
Leave your feedback...