





Arduino Oled Display Interface Tutorial

Made by play-with-circuit / Displays
About the project
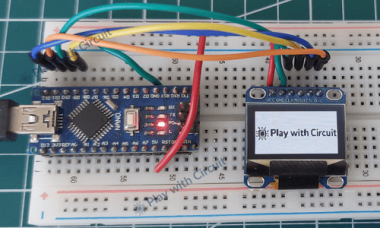
In this tutorial, we will interface a 0.96-inch SSD1306 OLED display with Arduino using both I2C and SPI communication interfaces.
Project info
Difficulty: Easy
Platforms: Arduino
Estimated time: 1 hour
License: GNU General Public License, version 3 or later (GPL3+)
Items used in this project
Hardware components

Story
Small OLED displays are one of the best ways to add a professional-looking visual interface to Arduino and embedded projects. Whether you want to display sensor values, menus, animations, or system information, OLED modules provide sharp graphics with minimal power consumption.
Unlike conventional LCDs, OLED displays do not require a backlight because each pixel generates its own light. This results in excellent contrast, deeper blacks, and better readability, even in low-light environments.
In this tutorial, we will interface a 0.96-inch SSD1306 OLED display with Arduino using both I2C and SPI communication interfaces. The project is beginner-friendly while also covering useful technical concepts for makers and embedded developers.
OLED Module Overview
The display module used in this tutorial is based on the SSD1306 controller IC. This controller receives commands from the Arduino and internally manages display rendering.
The OLED stores pixel information inside onboard memory called GDDRAM, which allows the screen to refresh independently without continuously loading data from the microcontroller.
Most SSD1306 OLED modules support operation from 3.3V to 5V, making them directly compatible with Arduino boards.
The module is commonly available in:
- I2C version → fewer connections and simpler setup
- SPI version → faster communication and refresh speed
I2C OLED Pinout
The I2C OLED module usually includes four pins:
Pin Description
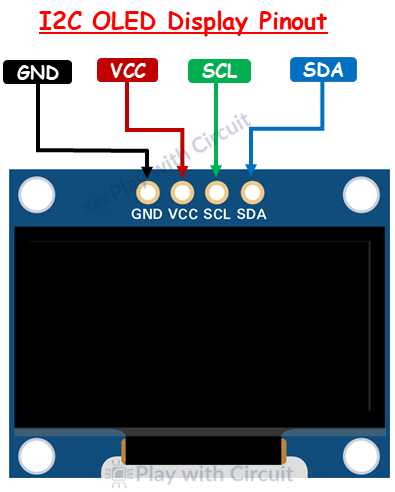
- GND → Ground connection
- VCC → Power supply input
- SCL → I2C clock line
- SDA → I2C data line
Most modules use the default I2C address 0x3C.
The I2C version is ideal for beginners because it minimizes wiring complexity.
SPI OLED Pinout
SPI OLED modules use additional communication pins for higher-speed data transfer.
Pin Description
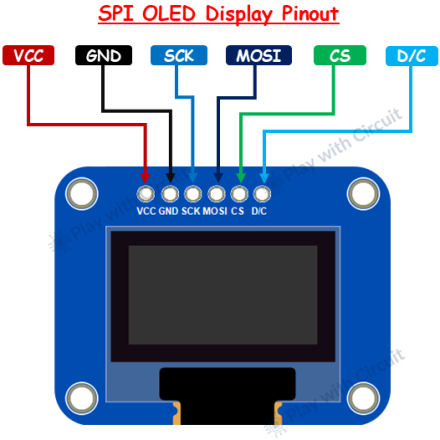
- GND → Ground
- VCC → Power supply
- SCK → SPI clock line
- MOSI → Serial data input
- CS → Chip select
- DC → Data/command selection
SPI communication is useful when displaying animations or rapidly updating graphics.
Understanding the Working Principle
The SSD1306 controller organizes display pixels into memory pages and columns. Each bit stored in the display memory represents the ON or OFF state of an OLED pixel.
When the Arduino sends graphical data:
This architecture improves performance and enables smooth rendering of graphics and text.
Hardware Connections I2C OLED Wiring
I2C OLED Wiring
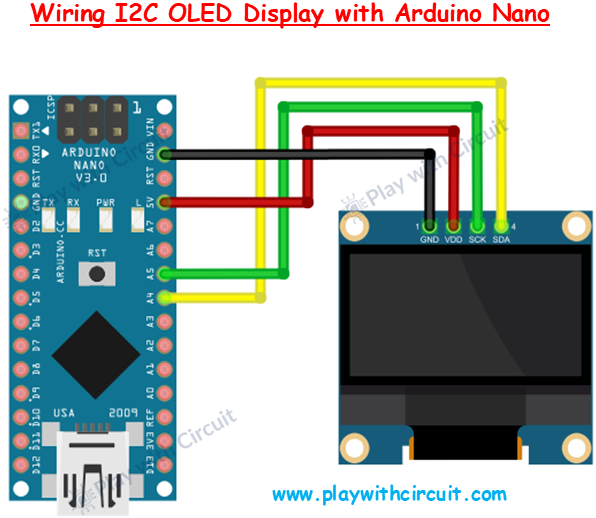
Connect the OLED display to Arduino as follows:
- OLED VCC → Arduino 5V
- OLED GND → Arduino GND
- OLED SCL → Arduino A5
- OLED SDA → Arduino A4
This is the simplest and most commonly used setup.
SPI OLED Wiring
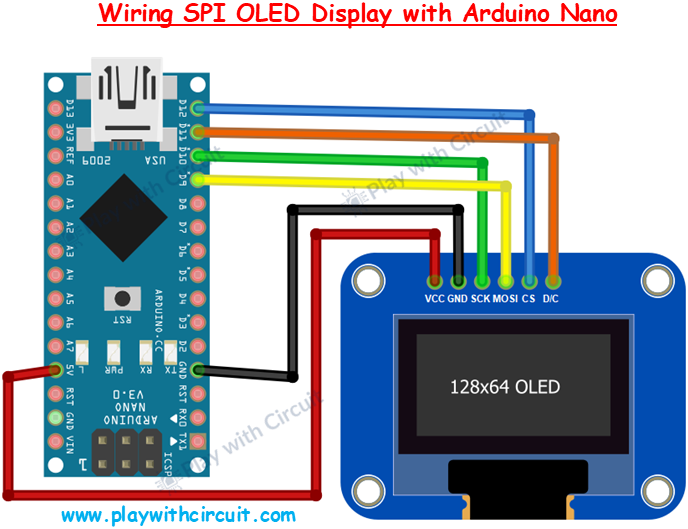
For SPI communication:
- OLED VCC → Arduino 5V
- OLED GND → Arduino GND
- OLED SCK → Arduino D10
- OLED MOSI → Arduino D9
- OLED CS → Arduino D12
- OLED DC → Arduino D11
SPI communication provides faster refresh performance compared to I2C.
Required Arduino Libraries
To simplify development, install these libraries through Arduino IDE Library Manager:
- Adafruit SSD1306
- Adafruit GFX
These libraries provide ready-made functions for:
- Displaying text
- Drawing shapes
- Rendering bitmap images
- Creating basic UI elements
Practical Applications
This OLED setup can be used in:
- Weather stations
- Smart sensors
- Battery monitoring systems
- Robotics interfaces
- Portable measurement tools
- IoT dashboards
Development Tips
- Run an I2C scanner sketch if the OLED is not detected
- Use short jumper wires to reduce communication noise
- Verify the display voltage rating before powering
- SPI is recommended for graphics-intensive projects
- Add pull-up resistors if using long I2C connections
Conclusion
OLED displays are a great addition to modern Arduino and embedded projects. They offer excellent readability, flexible graphics support, and low power consumption in a compact form factor.
Whether you choose I2C for simplicity or SPI for performance, SSD1306 OLED modules are easy to integrate and highly versatile for electronics development.
For complete implementation details, Arduino code, and detailed explanation, check the original tutorial here:
👉 https://playwithcircuit.com/interfacing-oled-display-with-arduino/
Code
Credits
Related products





Leave your feedback...