





Ai Text-to-speech With Raspberry Pi Pico W

Made by electroscope_archive / Artificial intelligence
About the project
Convert text into real speech using Raspberry Pi Pico W, Wi-Fi, and the Wit. ai cloud TTS API.
Project info
Items used in this project
Hardware components


Story
Text-to-Speech (TTS) systems convert written text into spoken audio. They are commonly used in voice assistants, smart devices, accessibility tools, and automation systems. While computers and smartphones can generate speech locally, microcontrollers usually lack the processing power and memory required for high-quality speech synthesis.
In this Raspberry Pi Pico Text to Speech using AI, we build a simple AI-powered Text-to-Speech system using the Raspberry Pi Pico W. Instead of generating speech locally, the Pico sends text to a cloud service, which converts it to audio and streams it back to the device. The audio is then played through a speaker using an I2S amplifier.
This cloud-based approach allows even small microcontrollers to produce natural-sounding speech with minimal hardware.
Raspberry Pi Pico Text to Speech using AI
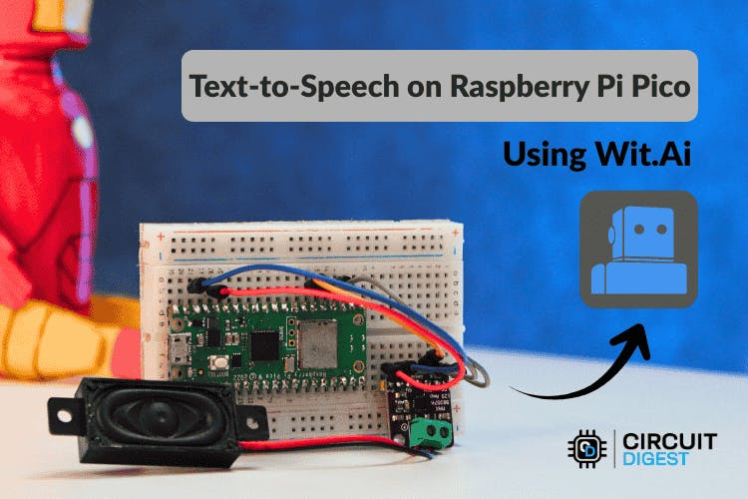
Raspberry Pi Pico Text to Speech using AI
How the System WorksThe system follows a simple workflow:
- The Raspberry Pi Pico W connects to Wi-Fi.
- Text is sent to the Wit.ai cloud API.
- Wit.ai converts the text into speech.
- The generated audio is streamed back to the Pico.
- The Pico plays the audio through an I2S amplifier and speaker.
Since the speech processing happens in the cloud, the microcontroller only handles communication and audio playback.
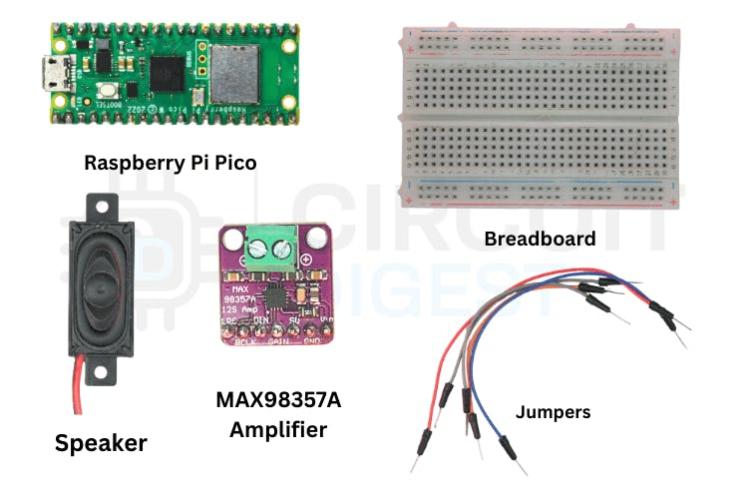
Hardware Required- Raspberry Pi Pico W
- MAX98357A I2S Digital Audio Amplifier
- 4Ω or 8Ω Speaker
- Breadboard
- Jumper Wires
- USB Cable (for power and programming)
Components
Components
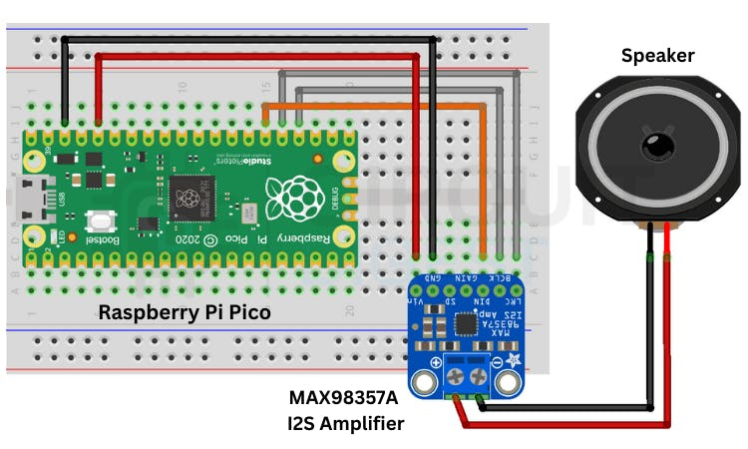
Circuit ConnectionsConnect the Pico W to the MAX98357A amplifier using the I2S interface.
Raspberry Pi Pico W MAX98357A Function
GP18 BCLK Bit Clock
GP19 LRC Left/Right Clock
GP20 DIN Data Input
5V VIN Power
GND GND Ground
The amplifier drives the speaker and plays the streamed audio.
Circuit Diagram
Circuit Diagram
Setting Up the Cloud TTS ServiceThis project uses Wit.ai, a free AI platform that provides APIs for speech and language processing.
Steps
- Create an account on the Wit.ai website.
- Create a new application from the dashboard.
- Open the Settings → HTTP API section.
- Copy the Server Access Token.
This token allows your device to communicate with the TTS service.
Installing the Library
The project uses the WitAITTS library.
- Install it through the Arduino IDE:
- Open Arduino IDE
- Go to Library Manager
- Search for WitAITTS
- Click Install

After installing, open the example sketch:
File → Examples → WitAITTS → PicoW_Basic
Arduino Code#include <WitAITTS.h>
const char* WIFI_SSID = "YourWiFiSSID";
const char* WIFI_PASSWORD = "YourWiFiPassword";
const char* WIT_TOKEN = "YOUR_WIT_AI_TOKEN_HERE";
WitAITTS tts;
void setup() {
Serial.begin(115200);
if (tts.begin(WIFI_SSID, WIFI_PASSWORD, WIT_TOKEN)) {
tts.setVoice("wit$Remi");
tts.setSpeed(100);
tts.setPitch(100);
Serial.println("TTS Ready!");
Serial.println("Type text in Serial Monitor to speak.");
} else {
Serial.println("TTS initialization failed");
}
}
void loop() {
tts.loop();
if (Serial.available()) {
String text = Serial.readStringUntil('n');
text.trim();
if (text.length() > 0) {
tts.speak(text);
}
}
}Connect the Pico W to your computer.
- Select the correct board and port in Arduino IDE.
- Upload the sketch.
- Open the Serial Monitor.
- Type a sentence and press Enter.
The text will be sent to the cloud and played through the speaker as speech.
Why Cloud-Based TTS?Using cloud TTS provides several advantages:
- High-quality speech synthesis
- Supports multiple voices and languages
- Low memory usage on the microcontroller
- Faster development with simple APIs
This makes it ideal for embedded devices with limited resources.
ApplicationsThis project can be extended for many practical applications:
- Smart home voice notifications
- Talking IoT devices
- Assistive technology for accessibility
- Interactive kiosks
- Voice alerts for monitoring systems
You can enhance this project by adding:
- Multi-language voice support
- Pre-recorded offline fallback messages
- Voice command input using speech-to-text
- Integration with MQTT or smart home platforms
Result:
With just a Pico W, a small amplifier, and a cloud API, you can add AI-powered speech output to almost any embedded project.
Explore more hands-on AI builds and tutorials in the complete collection of embedded AI projects on CircuitDigest
Schematics, diagrams and documents
Code
Credits
Related products





Leave your feedback...