
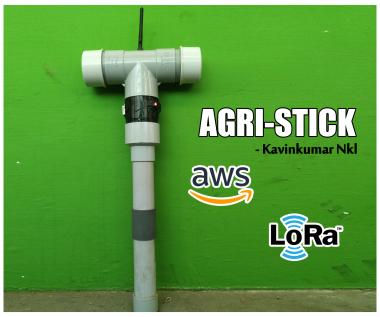
Agri-Stick

Made by Kavinkumar-Nkl
About the project
Farmers spend endless hours of driving to their field to check on their crops and manually operate the irrigation systems. This is time and labour intense with significant costs to the farmers and sub-optimal use of expensive resources. By using IoT to deliver unobtrusive easy to use and highly reliable systems for precision monitoring and control of irrigation. So, we are going to make an IoT hardware named “Agri-Stick” which is going to measure the four Agri parameters including Soil Temperature, Soil Moisture, Atmospheric Temperature and Atmospheric Humidity. These values are going to be updated in the AWS cloud through LoRa technology with Raspberry Pi as single channel LoRa gateway. These values can be monitored in real time from both web browser and mobile phone. It enables growers to make decision based on in-field data. Thus, it saves the time and money for farmers and improve yield and crop quality. By extending the sensors in the Agri-Stick and analysing the data with proper methods, we can use it for measuring soil nutrition, pest detection, and crop planning, spraying pesticides, irrigation and harvesting crops. It prevents over and under watering, reduces crop diseases, confirms water delivery as planned, automate tasks that had been done manually, water savings, labour savings and re-allocation to higher value activities.
Project info
Difficulty: Easy
Estimated time: 1 hour
Story
Step 1: TEMPERATURE SENSOR – DS18B20

We are going to make the hardware like a stick, which is going to be inserted in to the field. Therefore, the temperature sensor measuring the soil temperature should be waterproof and robust enough to corrosion. Temperature sensor (DS1B20) would match all these conditions. It exists in two forms. One is in IC and the other is in probe like structure. We are going to use the DS18B320 probe.
PIN CONNECTION:
DS18B20 Sensor <---> Arduino Nano
VCC - 5V
GND - GND
DATA - D5
Step 2: SOIL MOSITURE SENSOR – CAPACITIVE TYPE
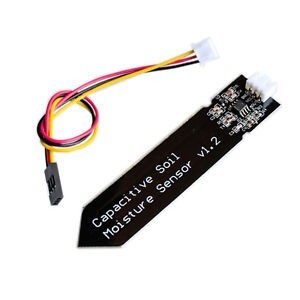
Soil moisture sensors measure the volumetric water content in the soil . As we considered for soil temperature, the soil moisture sensor should also be water proof and corrosion resistant. Capacitive type soil moisture sensor would match all these condition. It is cheap and robust enough to resist corrosion than resistive type.
The sensor consists of a single probe contains separate vcc and ground copper paths covered by solder mask act as flat capacitor. This layer will prevent the direct passing of electric current into the soil.
The sensor measures the soil moisture levels by capacitive sensing, rather than resistive sensing like other types of moisture sensor. Depending upon the water content of the soil, the dielectric of the soil changes. Thus it leads to the changing of the capacitance which is corresponding to the soil moisture content.
PIN CONNECTION:
Capacitive Soil Moisture Sensor <---> Arduino Nano
VCC - 5V
GND - GND
A0 - A1
Step 3: ATMOSPHERIC TEMPERATURE AND HUMIDITY SENSOR – DHT22 (AM2302)
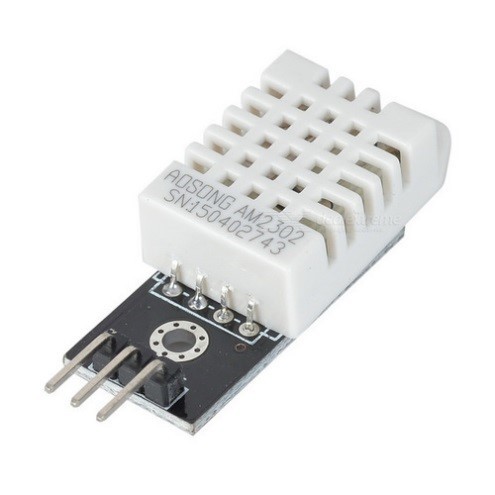
DHT22 output calibrated to digital signal. It utilizes exclusive digital-signal-collecting-technique and humidity sensing technology, assuring its reliability and stability. Its sensing elements is connected with 8-bit single-chip computer. Every sensor of this model is temperature compensated and calibrated in accurate calibration chamber and the calibration-coefficient is saved in type of programme in OTP memory, when the sensor is detecting, it will cite coefficient from memory. Small size & low consumption & long transmission distance(20m) enable DHT22 to be suited in all kinds of harsh application occasions.
PIN CONNECTION:
DHT22 <---> Arduino Nano
VCC - 5V
GND - GND
DATA - D4
Step 4: DEVICE CONNECTIVITY
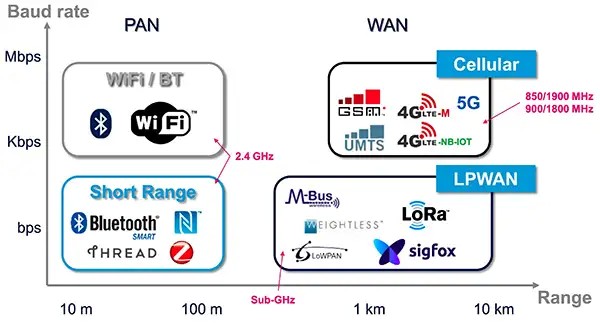
The core part of Internet of Things is how we are going to connect the things. Communication through radio frequency (RF), light and sound, and Bluetooth allows physical things to communicate with each other without wires, making the IoT a reality.
Since the Agri-stick and the internet, providing part is usually apart from each other in Kilometers range, it should be free of cost for the user. Communication should be bidirectional. In our case, the size of the data to be transmitted is less than 50kb. Since our Agri-Stick is going to be operated in battery, it should consume less power. It should also support encryption and authentication. By considering all these things, among the available technologies, LoRa will be suitable for our case.
Step 5: LoRa WIRELESS RF TECHNOLOGY

LoRa (short for long range) is a spread spectrum modulation technique derived from chirp spread spectrum (CSS) technology. Technically, it is a radio modulation scheme - a way of manipulating a radio wave to encode information using a chirped, multi-symbol format. LoRa also refers to the systems that support the modulation, including LoRa chips and gateways. Sometimes it refers to the LoRa communication network for IoT applications.LoRa, essentially, is a clever way to get very good receiver sensitivity and low bit error rate (BER) from inexpensive chips. That means low-data rate applications can get much longer range using LoRa rather than using other comparably priced radio technologies.
A Semtech innovation, LoRa Technology offers compelling features for IoT applications including long range, low power consumption and secure data transmission. The technology can be utilized by public, private or hybrid networks and provides greater range than cellular networks. LoRa Technology can easily plug into existing infrastructure and enables low-cost battery-operated IoT applications. Semtech builds LoRa Technology into its chipsets, which are incorporated into devices manufactured by a large ecosystem of IoT solution providers, and connected to networks around the globe. Simply stated, LoRa connects devices (or all things) to the Cloud.
Step 6: LoRa GATEWAY
Gateways form the bridge between devices and Cloud Network Services. Devices use low power networks like LoRa link protocol to connect to the Gateway, while the Gateway uses high bandwidth networks like Wi-Fi, Ethernet or Cellular to connect to cloud. All gateways within reach of a device will receive the device’s messages and forward them to the cloud. The network will reduplicate the messages and select the best gateway to forward any messages queued for downlink. A single LoRaWAN gateway can serve thousands of devices. Gateways are routers equipped with a LoRa concentrator, allowing them to receive LoRa packets. LoRaWAN operates on unlicensed bands, so in most countries, running your own gateway is completely legal. However, for our use case, we are going to make our own cost effective gateway using Raspberry pi and a LoRa chip. It uses single channel to transfer information between LoRa chip and Raspberry Pi. i.e. only one Agri stick will be able to communicate with the Raspberry Pi for an instant. This does not comes under the LoRaWAN category. However, it will be easily adaptable to LoRaWAN in future.
Step 7: ROUGH PROTOTYPE
It contain two parts:
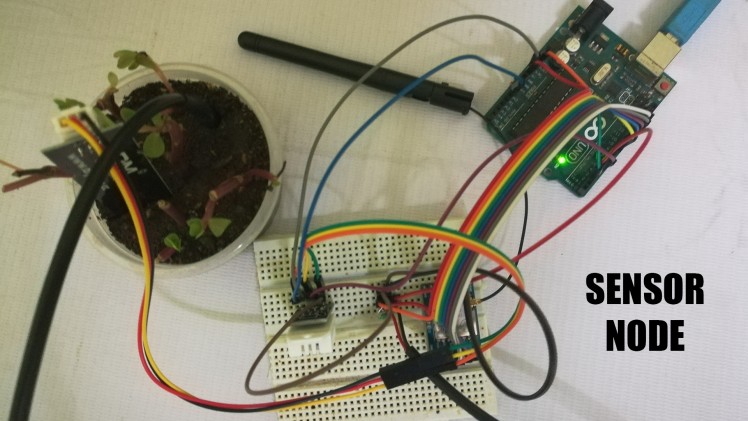
- Sensor Node
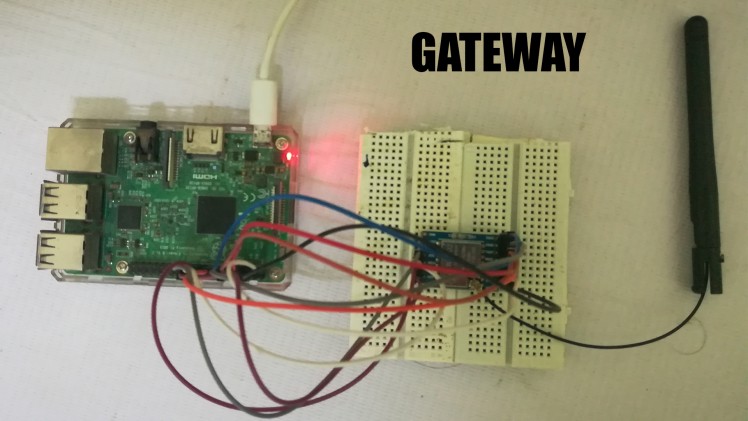
- Gateway
Sensor Node:
The rough prototype was made in breadboard. It just senses the agri parameters and displays in the local serial monitor in the PC and sends the data to the single channel LoRa gateway Raspberry Pi through LoRa chip. Arduino UNO was used for prototyping. It got power from the PC itself.
Gateway:
The gateway was also made in breadboard. The LoRa chip was connected to Rpi through jumpers. It got power from the 5V USB adapter.
Step 8: AGRI-STICK’s HARDWARE LAYOUT
The hardware part contains two sections.
- Agri-Stick part
- Gateway part.
In this, we are going to see how the hardware was designed which was robust enough to tolerate the field’s atmospheric condition.The hardware implementation of the stick consists of various auxiliary units like controller unit, communication unit, power unit and the sensor unit. All these units are connected together and kept in a stick like arrangement made up of PVC pipes.
Step 9: CONTROLLER UNIT
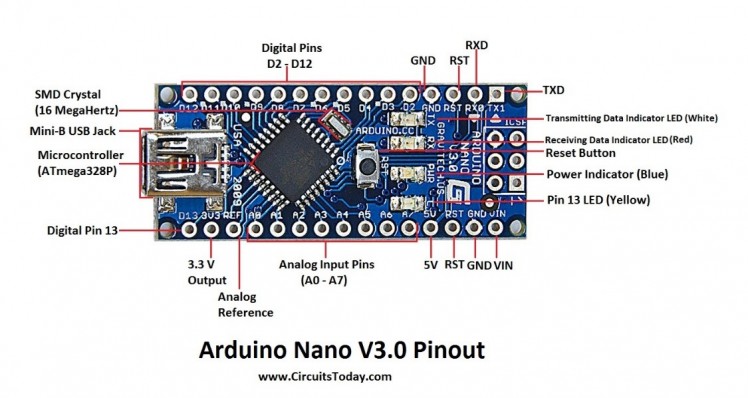
Here, we used ARDUINO NANO microcontroller as the controller. The Arduino Nano is a small, complete, and breadboard-friendly board based on the ATmega328P. The LoRa chip is going to be attached to this microcontroller via SPI interface. In addition, the sensors are going to be attached to this microcontroller through digital and analog pins.
Step 10: COMMUNICATION UNIT
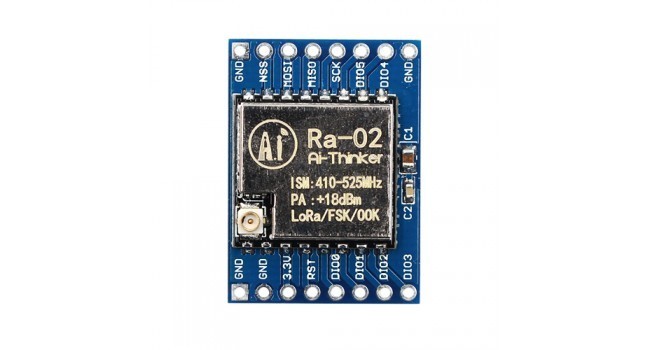
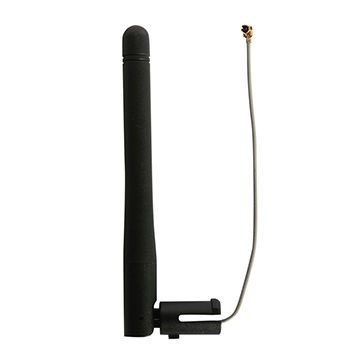
As already discussed, for communication we are going to use LoRa chip. The chip is SX1278, 433 MHz Ai Thinker Ra-02. It uses 433 MHz to communicate to other modules. It communicates with the controller using SPI (Serial Peripheral Interface).
Am living in India. Here, the frequency allocated for LoRa is 868 MHz. But, currently I cant get the 868MHz version. Also, am not using the project for commercial purposes as of now, I used 433 MHz version.
Also, I used the antenna for boosting the RF signals. Without antenna, signals can't be transmitted after a few meters. I have not researched lot about the antenna. Just got it from a local store which is fit for this version board.
Step 11: POWER UNIT

The power unit consists of
- single cell Lion battery,
- Boost Converter,
- TP4056-Lion Single cell charger.
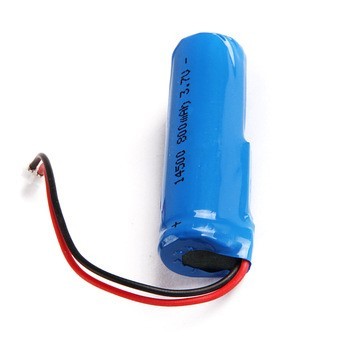
18650 Lion Battery:
It is 2200 mAh battery with nominal output voltage of 3.7V and maximum charge voltage of 4.2V. It should not be discharged below 3.3V.
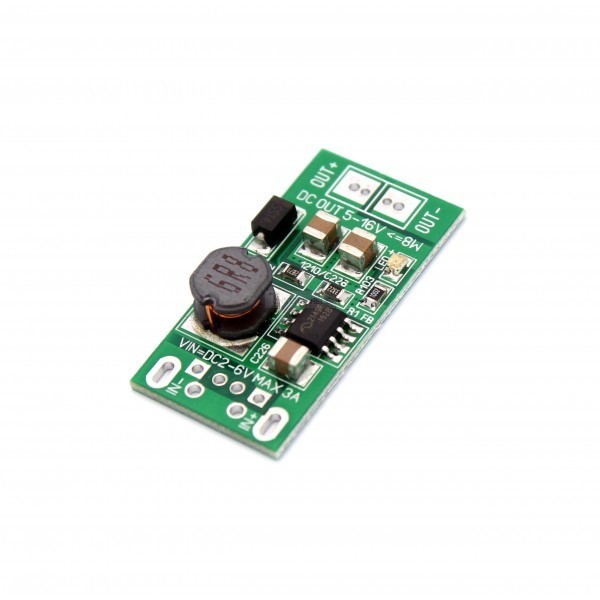
DC-DC Boost converter:
It is used to convert 3.7V Lion battery voltage to 5V for the microcontroller operations.
TP4056 Lion battery charger:
It is used to charge the Lion cell. It handles the all the constant current and constant voltage part.
A switch was used to switch on/off the power.
The connection was shown in the circuit diagram in the upcoming steps.
Step 12: CIRCUIT IN EAGLE PCB FOR AGRI STICK
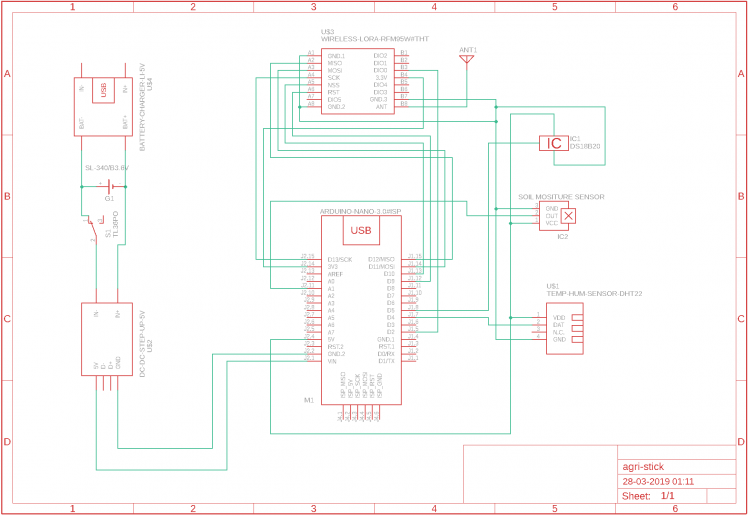
It is a self explanatory diagram.
Step 13: PARTS OF THE AGRI-STICK

This is the final prototype of the Agri-Sick. PVC pipes of different sizes, shapes were chosen. The sensors are placed in the stick as shown in the zoomed pictures. All the circuits, sensors, battery and arduino were placed and glued inside the stick. The bottom part was made water proof by properly sealing.
Step 14: INSTALLATION IN FIELD
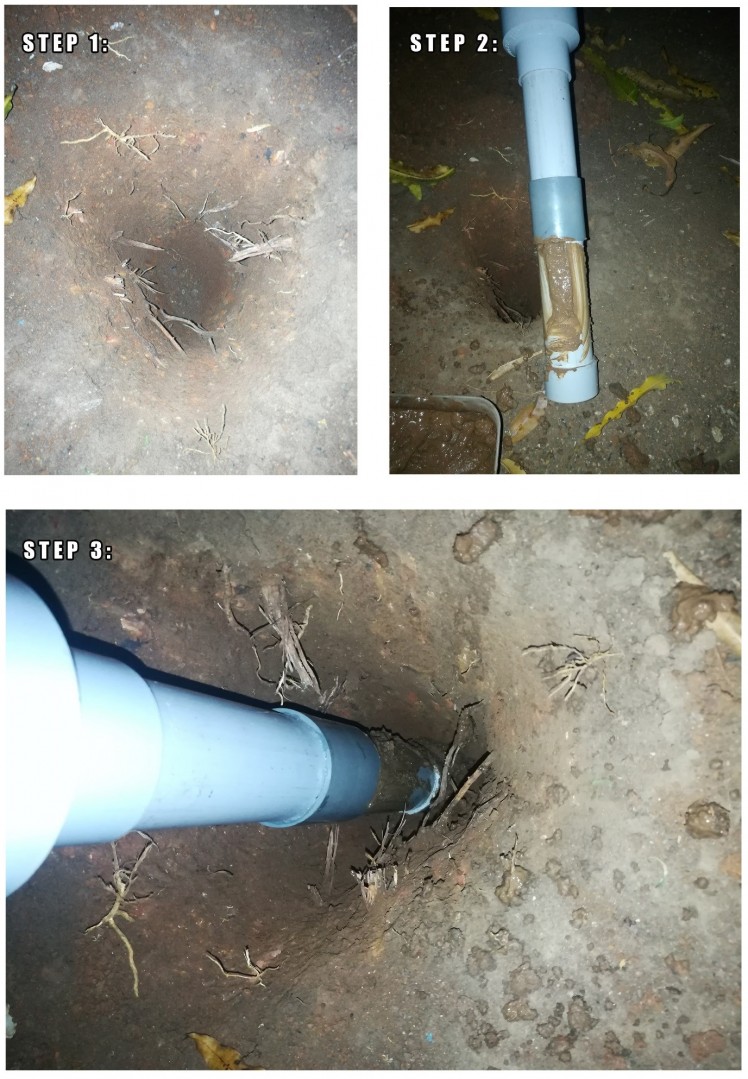
STEP 1:
A hole of one foot was dug in the land where we want to place the stick with diameter little bit larger than that of the Agri- Stick’s diameter.
STEP 2:
Surface of the soil moisture and temperature sensor were covered with some wet sand that had taken from the same land. Thus, it would make good contact with the underground soil and measure the correct values.
STEP 3:
Insert the Agri-Stick into the hole and cover the remaining volume of the hole with the same sand that had taken from the field.
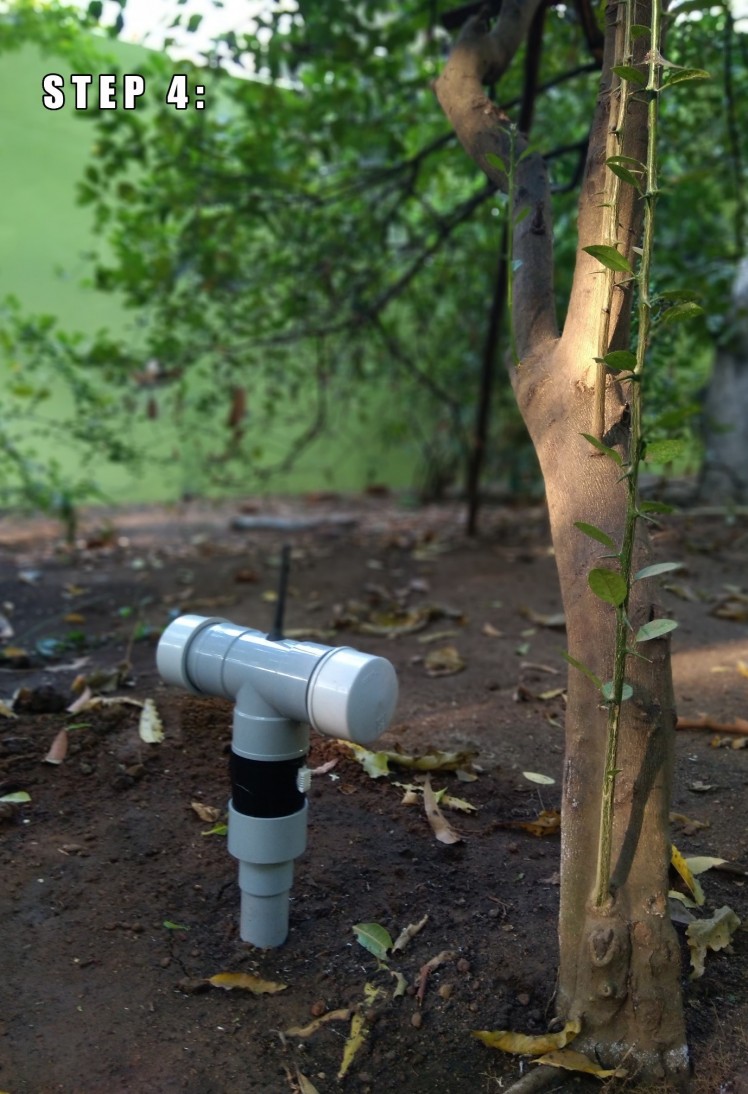
STEP 4:
The Agri-Stick was powered by switching on and the streaming of sensor values in the cloud were checked.
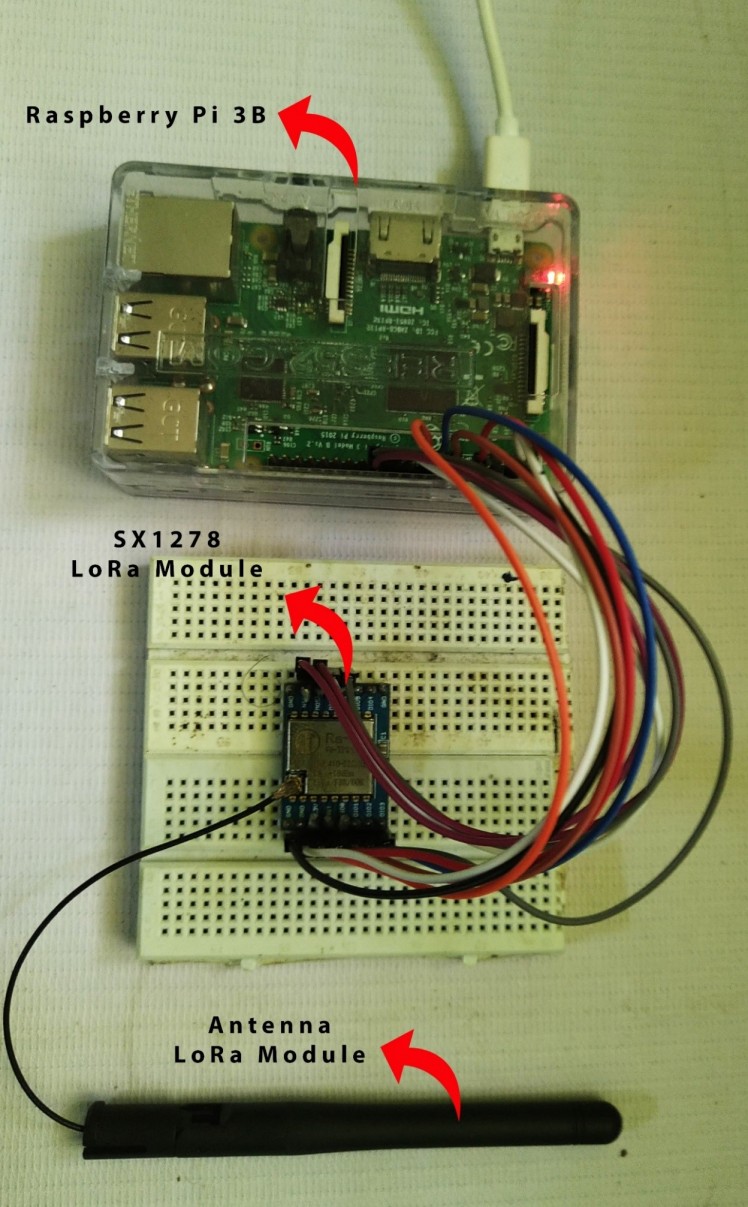
Step 15: GATEWAY’s HARDWARE LAYOUT
The gateway part consists of Raspberry Pi 3B and SX1278 LoRa chip. The LoRa chip receives the data from the Agri-Stick, sends it to Raspberry Pi through SPI and it sends the info to cloud via internet. Raspberry Pi converts RF packets into IP packets. As we tested, the range for our gateway is about 250 meters with some interference. Without interference, the range may be higher than that.
Step 16: Raspberry Pi 3 B Features:
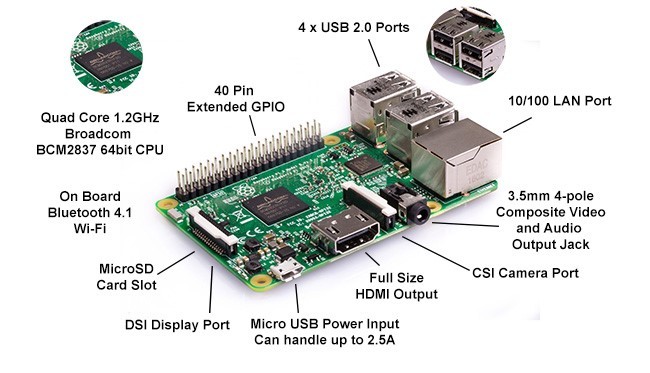
It contains Broadcom BCM2387 ARM Cortex-A53 Quad Core Processor powered Single Board Computer running at 1.2GHz! With 1GB RAM so you can run bigger and more powerful applications. It contains 40pin extended GPIO to enhance your “real world” projects. It uses 10/100 BaseT Ethernet socket to quickly connect the Raspberry Pi to the Internet
Step 17: CIRCUIT IN EAGLE PCB FOR GATEWAY
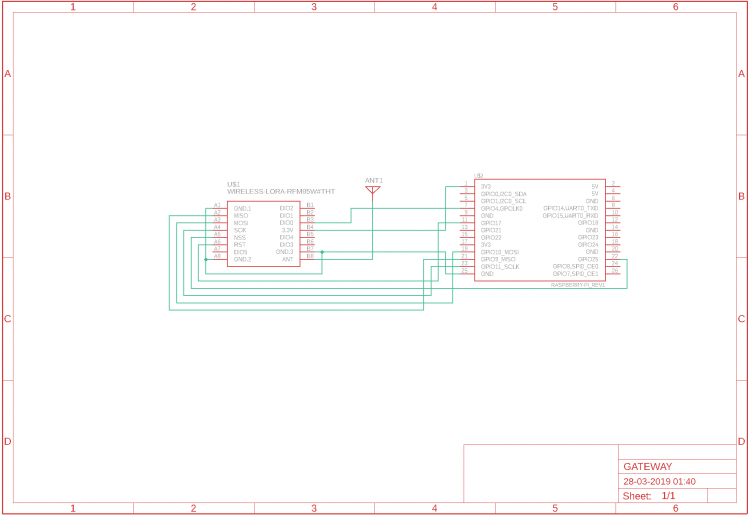
It is a self explanatory diagram.
Step 18: PARTS OF THE GATEWAY
Since my main goal is to properly design the Agri-stick and not the gateway, I left the gateway part as it is in the initial breadboard prototype. The another reason is in future we are going to use the commercial LoRa gateways.
Step 19: AMAZON WEB SERVICES - EC2

Amazon Web Services (AWS) is a secure cloud services platform, offering compute power, database storage, content delivery and other functionality to help businesses scale and grow. Explore how millions of customers are currently leveraging AWS cloud products and solutions to build sophisticated applications with increased flexibility, scalability and reliability.
Amazon Elastic Compute Cloud (EC2) provides virtual servers -- called instances -- for compute capacity. The EC2 service offers dozens of instance types with varying capacities and sizes, tailored to specific workload types and applications, such as memory-intensive and accelerated-computing jobs. AWS also provides an Auto Scaling tool to dynamically scale capacity to maintain instance health and performance. Also, it offers one year free tier usage with some limitations.
So by considering all the benefits, I have chosen AWS the for cloud part.
Step 20: EC2 CONFIGURATION
For our purpose, we have used “Ubuntu Server 18.04 LTS (HVM), SSD Volume Type” with t2.micro type instance which contains one virtual CPU and one GB memory. All these configurations are come under one year Amazon’s free tier policy for new users. The instance is configured with security group, which controls the inbound traffic to the server. Our configuration contains SSH protocol for remote access of the instance, HTTP and HTTPS protocols for internet traffic to our instance, and custom TCP protocol for MQTT for our instance. The ports associated with these protocols are 22, 80, 443, and 1884 respectively. Our instance is accessed from a SSH client software like Putty with the key pair. The key pair is used by the putty to connect to the instance. It is like a security option provided by AWS to authorise the user.
Step 21: MESSAGE QUEUING TELEMETRY TRANSPORT (MQTT)
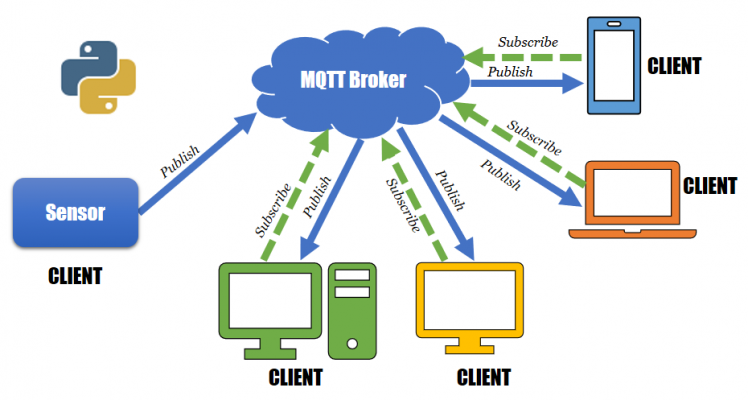
It is a lightweight publish and subscribe system where you can publish and receive messages as a client. MQTT is a simple messaging protocol, designed for constrained devices with low-bandwidth. Therefore, it is the perfect solution for Internet of Things applications. MQTT allows you to send commands to control outputs, read and publish data from sensor nodes and much more. For this, we need a broker and clients as subscriber and publisher. Here our gate way is our publisher, AWS EC2 instance is our subscriber and also it acts a MQTT Broker. Here the publisher (Raspberry pi gateway) publishes the sensor values to a specific topic like “agrstick1”. If we are using multiple gateways, we can publish under different topics. The MQTT broker captures these values under the topic and wait for the subscriber to subscribe for the same topic. If any client subscribes under the same topic, it will then send the values to it. Thus, our subscriber client in EC2 instance will get the values whenever the publisher publishes the message.
Step 22: SQLITE DATABASE
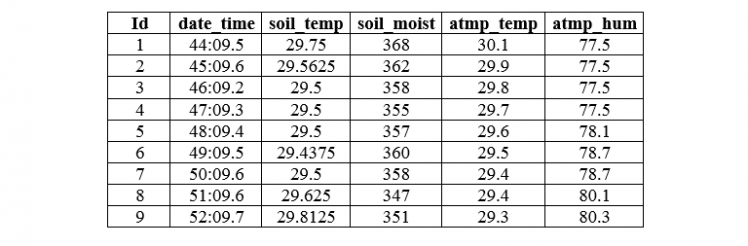
SQLite is a relational database management system contained in a C programming library. In contrast to many other database management systems, SQLite is not a client–server database engine. Rather, it is embedded into the end program. The data that we got from the broker is first stored in the sqlite base for future processing. It uses sqlite3 version. The database file name is “agristick.db” and the table name inside the database is DATASEN as shown in the above figure. It contains six columns for storing the auto increment id, date time, soil temperature, soil moisture, atmospheric temperature and atmospheric humidity.
Step 23: WEBPAGE AND VISUALISATION
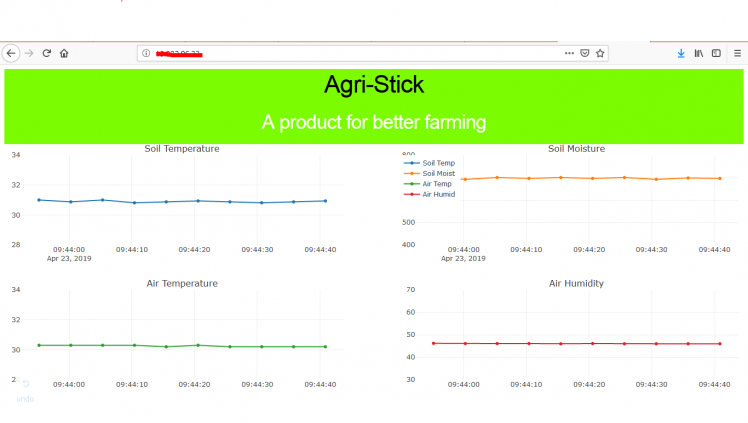
For webpage, we used plotly and dash. Dash is a framework for building analytics web apps. Dash is a productive Python framework for building web applications. Written on top of Flask, Plotly.js, and React.js, Dash is ideal for building data visualization apps with highly custom user interfaces in pure Python. Through a couple of simple patterns, Dash abstracts away all of the technologies and protocols that are required to build an interactive web-based application. Dash apps are rendered in the web browser. You can deploy your apps to servers and then share them through URLs. Since Dash apps are viewed in the web browser, Dash is inherently cross-platform and mobile ready.
The above image is the webpage that I have created. Whenever the Agri-Stick publishes a new valu, the webpage get updated. Since I have not used DNS for the website, I simply used the IP address of the server to access the page. For security reasons, I hid the IP address.
Step 24: DATA FLOW
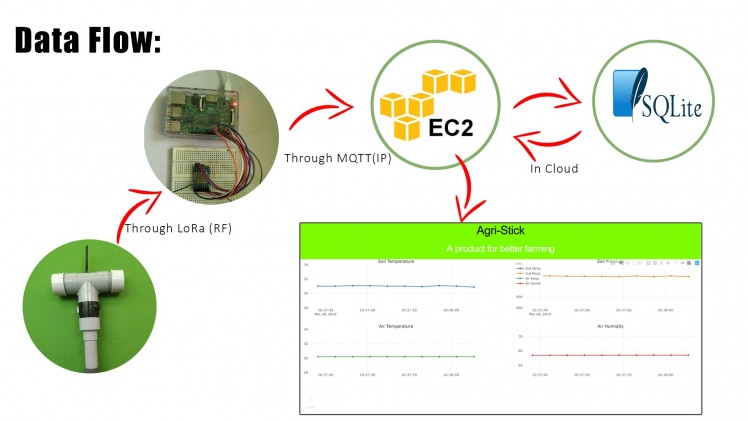
The flow of data from the Agri-Stick to web page was illustrated in the figure.
- Through RF(LoRa) from Agri-Stick to Raspberry Pi gateway.
- Through internet from gateway to AWS EC2 instance using MQTT protocol.
- Data is stored in a database in EC2 instance.
- From that database to the hosted web page.
Step 25: CODES
Arduino Code for Agri-Stick :
#include <spi.h> // for SPI LoRa<br>#include <lora.h> // For LoRa
#include <onewire.h> // for DS18b20
#include <dallastemperature.h> for DS18b20
#include<stdlib.h> // included for floatToString function
#include <dht.h>; // For DHT22</dht.h></stdlib.h></dallastemperature.h></onewire.h></lora.h></spi.h>
#define DHTPIN 4     // what pin we're connected to
#define DHTTYPE DHT22   // DHT 22  (AM2302)
DHT dht(DHTPIN, DHTTYPE); // Initialize DHT sensor for normal 16mhz Arduino
#define ONE_WIRE_BUS 5 // DS18b20 pin
OneWire oneWire(ONE_WIRE_BUS);
DallasTemperature sensors(&oneWire);String data_string = " ";
String data_string_p = " ";
String temp_string = " ";
String hum_string = " ";
String airtemp_string = " ";
String soilmois_string = " ";
float soil_temp_float; //Stores soil temperature value
float atm_hum;  //Stores humidity value
float atm_temp; //Stores atmospheric temperature value
int soil_mois; //Stores soil moisture value// Function for converting float to string
String floatToString(float x, byte precision = 4) {
  char tmp[7];
  dtostrf(x, 0, precision, tmp);
  return String(tmp);
}
void setup()
{
  Serial.begin(9600);
  Serial.println(" Welcome to AgriStick Sensor Node ");
  Serial.println(" It includes n Soil temperature,n Soil moisture,n Atmospheric temperature,n Atmospheric humidity n");
  pinMode(A3, INPUT);
  pinMode(A4, INPUT);
  pinMode(A5, INPUT);
  dht.begin();
  sensors.begin();
  if (!LoRa.begin(433E6)) {
    Serial.println("Starting LoRa failed!");
while (1);
  }
  LoRa.enableCrc();
}
void loop() {
  sensors.requestTemperatures();
  soil_temp_float = sensors.getTempCByIndex(0);
atm_hum = dht.readHumidity();
  atm_temp = dht.readTemperature();
soil_mois = analogRead(A1);
if (soil_temp_float <= 0 || atm_hum <= 0 || atm_temp <= 0 || soil_mois <= 0)
  {
    return;
  }
temp_string = floatToString(soil_temp_float);
  hum_string = floatToString(atm_hum);
  airtemp_string = floatToString(atm_temp);
  soilmois_string = String(soil_mois);
data_string = ( temp_string + soilmois_string + airtemp_string + hum_string );
  data_string_p = ( "Soil Temp: " + temp_string + " Soil Moist: " + soilmois_string + " Atmp Temp: " + airtemp_string + " Atmp Hum: " + hum_string );
  Serial.println(data_string_p);
LoRa.beginPacket();
  uint8_t data[(data_string.length() + 2)];
  data_string.toCharArray(data, (data_string.length() + 2));
  LoRa.write(data, sizeof(data));
  Serial.println("Packet sent");
  LoRa.endPacket();

 delay(60000);
}
Database creation python code for Raspberry Pi:
import sqlite3<br># SQLite DB Name
DB_Name =  "agristick.db"
# SQLite DB Table Schema for sensor data raw value
TableSchema_SD="""
drop table if exists sendata ;
create table sendata (
  id integer primary key autoincrement,
  date_time text,
  soil_temp float,
  soil_moist int,
  atmp_temp float,
  atmp_hum float
);
"""
#Connect or Create DB File
conn = sqlite3.connect(DB_Name)
curs = conn.cursor()
#Create Tables for sensor data raw value
sqlite3.complete_statement(TableSchema_SD)
curs.executescript(TableSchema_SD)
#Close DB
curs.close()
conn.close()
Gateway python Code for Raspberry Pi:
#!/usr/bin/env python3<br>
""" A simple continuous receiver class. """
# Copyright 2015 Mayer Analytics Ltd.
#
# This file is part of pySX127x.
#
# pySX127x is free software: you can redistribute it and/or modify it under the terms of the GNU Affero General Public
# License as published by the Free Software Foundation, either version 3 of the License, or (at your option) any later
# version.
#
# pySX127x is distributed in the hope that it will be useful, but WITHOUT ANY WARRANTY; without even the implied
# warranty of MERCHANTABILITY or FITNESS FOR A PARTICULAR PURPOSE. See the GNU Affero General Public License for more
# details.
#
# You can be released from the requirements of the license by obtaining a commercial license. Such a license is
# mandatory as soon as you develop commercial activities involving pySX127x without disclosing the source code of your
# own applications, or shipping pySX127x with a closed source product.
#
# You should have received a copy of the GNU General Public License along with pySX127.  If not, see
# <http: www.gnu.org="" licenses=""></http:>.

from time import sleep
from SX127x.LoRa import *
from SX127x.LoRaArgumentParser import LoRaArgumentParser
from SX127x.board_config import BOARD
import sqlite3
import datetime
import paho.mqtt.publish as publish
# SQLite DB Name
DB_Name =  "/home/pi/FYP/agristick.db"
BOARD.setup()
parser = LoRaArgumentParser("Continous LoRa receiver.")
#===============================================================
# Database Manager Class
class DatabaseManager():
        def __init__(self):
                self.conn = sqlite3.connect(DB_Name)
                self.conn.execute('pragma foreign_keys = on')
                #self.conn.execute('pragma journal_mode = wal;')
                self.conn.commit()
                self.cur = self.conn.cursor()

        def add_del_update_db_record(self, sql_query, args=()):
                self.cur.execute(sql_query, args)
                self.conn.commit()
                return

        def __del__(self):
                self.cur.close()

#===============================================================
class LoRaRcvCont(LoRa):
    def __init__(self, verbose=False):
        super(LoRaRcvCont, self).__init__(verbose)
        self.set_mode(MODE.SLEEP)
        self.set_dio_mapping([0] * 6)

    def on_rx_done(self):
        BOARD.led_on()
        #print("nRxDone")
        self.clear_irq_flags(RxDone=1)
        payload = self.read_payload(nocheck=True)
        payload = payload[:-1]

        d = datetime.datetime.now()
        d = str(d)
        mystring = ""
        for char in payload:
                mystring = mystring + chr(char)
        #print (mystring)
        soil_temp = mystring[0:7]
        soil_moist = mystring[7:10]
        atmp_temp = mystring[10:17]
        atmp_hum = mystring[17:24]
        print("datetime: " + d)
        print("Soil Temperature: " + soil_temp)
        print("Soil Moisture: " + soil_moist)
        print("Atmospheric Temperature: " + atmp_temp)
        print("Atmospheric Humidity: " + atmp_hum)
        stringformqtt = d+','+soil_temp+','+soil_moist+','+atmp_temp+','+atmp_hum
        print(stringformqtt)
        #---------------------------------------------------------------------------------------------------------

        dbObj = DatabaseManager()
        dbObj.add_del_update_db_record("insert into sendata (date_time,soil_temp,soil_moist,atmp_temp,atmp_hum) values (?,?,?,?,?)",[d,float(soil_temp),int(soil_moist)$
        del dbObj
        print ("Inserted Data into SENSOR DATA Database.")
       # publish.single("agristick1",str(stringformqtt),hostname="13.232.96.33",auth = {'username':"ubuntu", 'password':"ceglaeee"})
        #print("sent to cloud")
        #---------------------------------------------------------------------------------------------------------
        self.set_mode(MODE.SLEEP)
        self.reset_ptr_rx()
        BOARD.led_off()
        self.set_mode(MODE.RXCONT)

    def on_tx_done(self):
        print("nTxDone")
        print(self.get_irq_flags())

    def on_cad_done(self):
        print("non_CadDone")
        print(self.get_irq_flags())

    def on_rx_timeout(self):
        print("non_RxTimeout")
        print(self.get_irq_flags())

    def on_valid_header(self):
        print("non_ValidHeader")
        print(self.get_irq_flags())

    def on_payload_crc_error(self):
        print("non_PayloadCrcError")
        print(self.get_irq_flags())

    def on_fhss_change_channel(self):
        print("non_FhssChangeChannel")
        print(self.get_irq_flags())

    def start(self):
        self.reset_ptr_rx()
        self.set_mode(MODE.RXCONT)
        while True:
            sleep(.5)
            rssi_value = self.get_rssi_value()
            status = self.get_modem_status()
            sys.stdout.flush()
            sys.stdout.write("r%d %d %dn" % (rssi_value, status['rx_ongoing'], status['modem_clear']))

lora = LoRaRcvCont(verbose=False)
args = parser.parse_args(lora)
lora.set_mode(MODE.STDBY)
lora.set_pa_config(pa_select=1)
lora.set_freq(433)
lora.set_bw(BW.BW125)
lora.set_spreading_factor(7)
lora.set_rx_crc(True)
lora.set_coding_rate(CODING_RATE.CR4_5)
#lora.set_pa_config(max_power=0, output_power=0)
#lora.set_lna_gain(GAIN.G1)
#lora.set_implicit_header_mode(False)
#lora.set_low_data_rate_optim(True)
#lora.set_pa_ramp(PA_RAMP.RAMP_50_us)
#lora.set_agc_auto_on(True)
#print(lora)
assert(lora.get_agc_auto_on() == 1)
#try: input("Press enter to start...")
#except: pass

try:
    lora.start()
except KeyboardInterrupt:
    sys.stdout.flush()
    print("")
    sys.stderr.write("KeyboardInterruptn")
finally:
    sys.stdout.flush()
    print("")
    lora.set_mode(MODE.SLEEP)
    print(lora)
    BOARD.teardown()
Database creation python code for AWS EC2 instance:
import sqlite3<br>
# SQLite DB Name
DB_Name =  "agristick.db"
# SQLite DB Table Schema for sensor data raw value
TableSchema_SD="""
drop table if exists DATASEN ;
create table DATASEN (
  id integer primary key autoincrement,
  date_time text,
  soil_temp float,
  soil_moist int,
  atmp_temp float,
  atmp_hum float
);
"""
#Connect or Create DB File
conn = sqlite3.connect(DB_Name)
curs = conn.cursor()
#Create Tables for sensor data raw value
sqlite3.complete_statement(TableSchema_SD)
curs.executescript(TableSchema_SD)
#Close DB
curs.close()
conn.close()
MQTT subscriber python code for AWS EC2 instance:
import paho.mqtt.subscribe as subscribe<br>import sqlite3
# SQLite DB Name
DB_Name =  "/home/ubuntu/flaskapp/agristick.db"
#sqliteConnection    = sqlite3.connect(DB_Name)
#sqliteConnection.execute('pragma journal_mode=wal;')
#cursorObject   = sqliteConnection.cursor()
#===============================================================
def on_message(client, userdata, message):
    #print("%s %s" % (message.topic, message.payload))
    mqttmessage = str(message.payload)
    topic = str(message.topic)
    mqttmessage = mqttmessage[2:-1]
    print(mqttmessage)
    dt = mqttmessage[0:26]
    st = float(mqttmessage[27:34])
    sm = int(mqttmessage[35:38])
    at = float(mqttmessage[39:46])
    ah = float(mqttmessage[47:54])
    print(mqttmessage)
    print(dt)
    print(st)
    print(sm)
    print(at)
    print(ah)
    sqliteConnection    = sqlite3.connect(DB_Name)
    cursorObject        = sqliteConnection.cursor()
    sqliteConnection.execute('pragma journal_mode=wal;')
    cursorObject.execute("INSERT INTO DATASEN (date_time,soil_temp,soil_moist,atmp_temp,atmp_hum) VALUES(?,?,?,?,?)",[dt,st,sm,at,ah])
    cursorObject.execute("COMMIT")
    cursorObject.close()
    print ("Inserted Data into DATASEN Database.")
topics = ["agristick1","agristick2"]
subscribe.callback(on_message, topics, hostname="Ip address of the server",auth = {'username':"ubuntu", 'password':"password set for MQTT"})
Webpage visualization python code for AWS EC2 instance:
# -*- coding: utf-8 -*-<br>import dash
import dash_core_components as dcc
import dash_html_components as html
import plotly
from dash.dependencies import Input, Output
import sqlite3
import datetime
from flask import Flask
import requests
server = Flask(__name__)
server.secret_key ='test'
#conn = sqlite3.connect('/home/ubuntu/flaskapp/agristick.db',check_same_thread=False)
#c = conn.cursor()
external_stylesheets = ['https://codepen.io/chriddyp/pen/bWLwgP.css']
app = dash.Dash(__name__,server=server, external_stylesheets=external_stylesheets)
app.layout = html.Div(style={'backgroundColor': '#7CFC00'},children=[
    html.H1(
        children='Agri-Stick',
        style = {
                'textAlign':'center',
                'color' : '#000000'
        }),
    html.H2(children= 'A product for better farming',
        style={
                'textAlign':'center',
                'color': '#FFFFFF'
        }),
        dcc.Graph(id='live-update-graph'),
        dcc.Interval(
            id='interval-component',
            interval=1*3000, # in milliseconds
            n_intervals=3000
        )
        ])
@app.callback(Output('live-update-graph', 'figure'),
              [Input('interval-component', 'n_intervals')])
def update_graph_live(n_intervals):
    conn = sqlite3.connect('/home/ubuntu/flaskapp/agristick.db',check_same_thread=False)
    conn.execute('pragma journal_mode=wal;')
    c = conn.cursor()    c.execute('SELECT * FROM DATASEN ORDER BY id DESC LIMIT 10 OFFSET 0')
    conn.commit()
    data = c.fetchall()
    conn.close()
    dts0 = data[9][1]
    dts1 = data[8][1]
    dts2 = data[7][1]
    dts3 = data[6][1]
    dts4 = data[5][1]
    dts5 = data[4][1]
    dts6 = data[3][1]
    dts7 = data[2][1]
    dts8 = data[1][1]
    dts9 = data[0][1]
    dt0 = datetime.datetime.strptime(dts0,'%Y-%m-%d %H:%M:%S.%f')
    dt1 = datetime.datetime.strptime(dts1,'%Y-%m-%d %H:%M:%S.%f')
    dt2 = datetime.datetime.strptime(dts2,'%Y-%m-%d %H:%M:%S.%f')
    dt3 = datetime.datetime.strptime(dts3,'%Y-%m-%d %H:%M:%S.%f')
    dt4 = datetime.datetime.strptime(dts4,'%Y-%m-%d %H:%M:%S.%f')
    dt5 = datetime.datetime.strptime(dts5,'%Y-%m-%d %H:%M:%S.%f')
    dt6 = datetime.datetime.strptime(dts6,'%Y-%m-%d %H:%M:%S.%f')
    dt7 = datetime.datetime.strptime(dts7,'%Y-%m-%d %H:%M:%S.%f')
    dt8 = datetime.datetime.strptime(dts8,'%Y-%m-%d %H:%M:%S.%f')
    dt9 = datetime.datetime.strptime(dts9,'%Y-%m-%d %H:%M:%S.%f')
    soil_temp0 = data[9][2]
    soil_temp1 = data[8][2]
    soil_temp2 = data[7][2]
    soil_temp3 = data[6][2]
    soil_temp4 = data[5][2]
    soil_temp5 = data[4][2]
    soil_temp6 = data[3][2]
    soil_temp7 = data[2][2]
    soil_temp8 = data[1][2]
    soil_temp9 = data[0][2]
    soil_moist0 = data[9][3]
    soil_moist1 = data[8][3]
    soil_moist2 = data[7][3]
    soil_moist3 = data[6][3]
    soil_moist4 = data[5][3]
    soil_moist5 = data[4][3]
    soil_moist6 = data[3][3]
    soil_moist7 = data[2][3]
    soil_moist8 = data[1][3]
    soil_moist9 = data[0][3]
    air_temp0 = data[9][4]
    air_temp1 = data[8][4]
    air_temp2 = data[7][4]
    air_temp3 = data[6][4]
    air_temp4 = data[5][4]
    air_temp5 = data[4][4]
    air_temp6 = data[3][4]
    air_temp7 = data[2][4]
    air_temp8 = data[1][4]
    air_temp9 = data[0][4]
    air_hum0 = data[9][5]
    air_hum1 = data[8][5]
    air_hum2 = data[7][5]
    air_hum3 = data[6][5]
    air_hum4 = data[5][5]
    air_hum5 = data[4][5]
    air_hum6 = data[3][5]
    air_hum7 = data[2][5]
    air_hum8 = data[1][5]
    air_hum9 = data[0][5]
#===================================================================
    fig = plotly.tools.make_subplots(rows=2, cols=2,subplot_titles= ('Soil Temperature','Soil Moisture','Air Temperature','Air Humidity'), vertical_spacing=0.2)
    fig['layout']['margin'] = {
         'l':30 , 'r': 10, 'b': 20, 't': 20
     }
    fig['layout']['legend'] = {'x': 0.53, 'y': 1, 'xanchor': 'left'}    fig.append_trace({
        'x': [dt0,dt1,dt2,dt3,dt4,dt5,dt6,dt7,dt8,dt9],
        'y': [soil_temp0,soil_temp1,soil_temp2,soil_temp3,soil_temp4,soil_temp5,soil_temp6,soil_temp7,soil_temp8,soil_temp9],
        'name': 'Soil Temp',
        'mode': 'lines+markers',
        'type': 'scatter'
    }, 1, 1)
    fig.append_trace({
        'x': [dt0,dt1,dt2,dt3,dt4,dt5,dt6,dt7,dt8,dt9],
        'y': [soil_moist0,soil_moist1,soil_moist2,soil_moist3,soil_moist4,soil_moist5,soil_moist6,soil_moist7,soil_moist8,soil_moist9],
        'name': 'Soil Moist',
        'mode': 'lines+markers',
        'type': 'scatter'
    }, 1, 2)
    fig.append_trace({
        'x': [dt0,dt1,dt2,dt3,dt4,dt5,dt6,dt7,dt8,dt9],
        'y': [air_temp0,air_temp1,air_temp2,air_temp3,air_temp4,air_temp5,air_temp6,air_temp7,air_temp8,air_temp9],
        'name': 'Air Temp',
        'mode': 'lines+markers',
        'type': 'scatter'
    }, 2, 1)
    fig.append_trace({
        'x': [dt0,dt1,dt2,dt3,dt4,dt5,dt6,dt7,dt8,dt9],
        'y': [air_hum0,air_hum1,air_hum2,air_hum3,air_hum4,air_hum5,air_hum6,air_hum7,air_hum8,air_hum9],
        'name': 'Air Humid',
        'mode': 'lines+markers',
        'type': 'scatter'
    }, 2, 2)
    fig['layout']['yaxis1'].update(range=[28,34])
    fig['layout']['yaxis2'].update(range=[400,800])
    fig['layout']['yaxis3'].update(range=[28,34])
    fig['layout']['yaxis4'].update(range=[45,75])
    return fig
if __name__ == '__main__':
    app.run_server(debug=True)
Codes for all modules are in the github page:
https://github.com/kavinkuma6/Agri-Stick/
Step 26: OBSERVATION FROM THE GRAPH
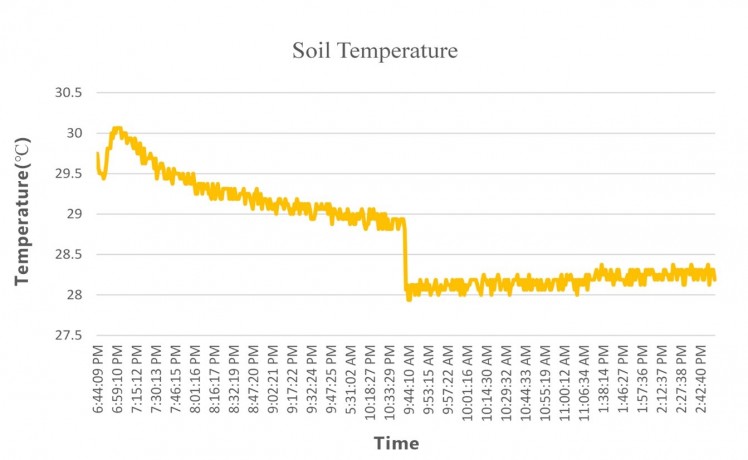
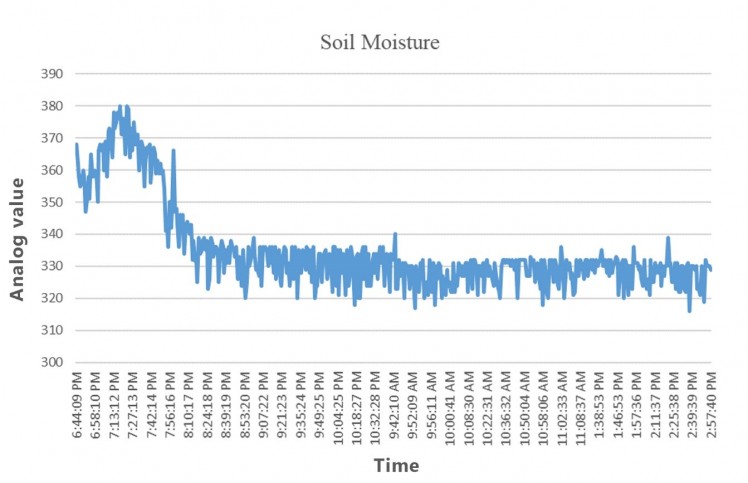
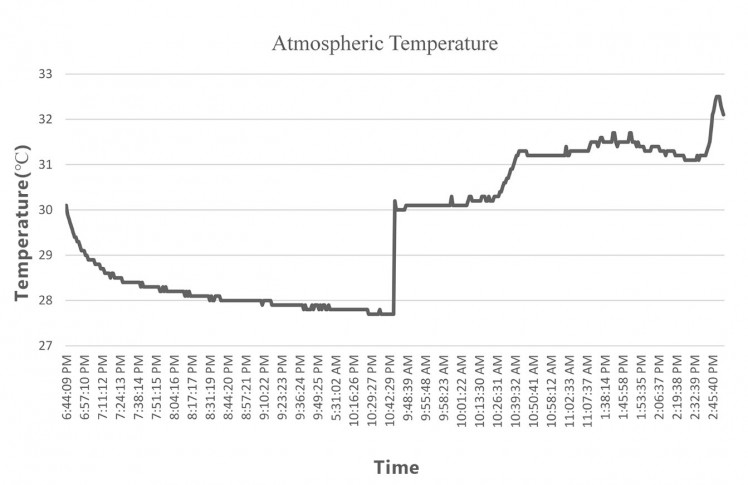
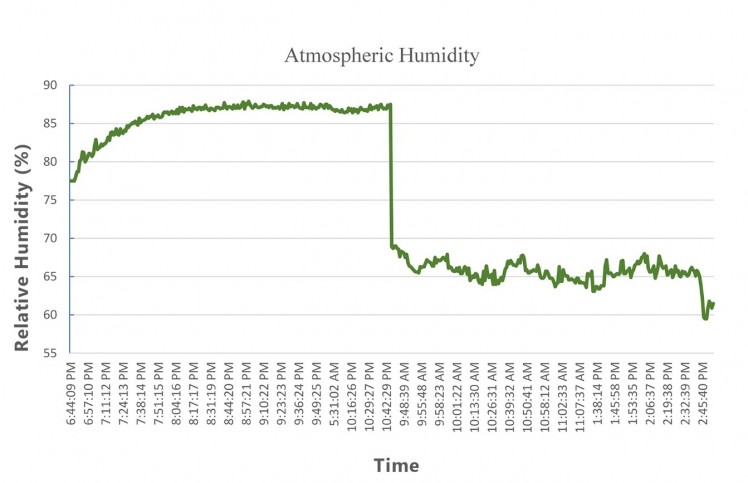
These graphs were created using Microsoft Excel for observation purposes.
The above graphs were plotted between time in X-axis and Soil Temperature, Soil Moisture, Atmospheric Temperature and Atmospheric Humidity in Y-axis of corresponding graphs. The time for recording the values were from 6:44 PM to 10:42 PM on 01-April-2019 and from 9:48 AM to 2:45 PM on 02-April-2019.
- The soil temperature in night time is higher than that of in the daytime.
- Soil moisture depends upon the irrigation pattern.
- Atmospheric temperature of night time is lesser than that of the day time.
- Atmospheric humidity of night time is higher than that of the day time.
Step 27: CONCLUSION
- As of now, the device is capable of sensing limited parameters only. In future, it should be equipped with many sensors like NPK, Co2, O2, pH, etc to increase the features of the stick.
- Now it is powered with battery which should be recharged. It is a hassle thing to the farmer. In future, it should be solar powered.
- As of now we used Raspberry pi as a single channel gateway to receive LoRa packets. Since the LoRa technology is popular now a days, in future, there is more possibility for the installation of LoRa gateway towers in our country. So, it becomes easier to send the sensor data to cloud from anywhere in the field.
- As of now, the values are just monitored in the cloud. In future, it is used to automate the farming, to take intelligent decisions about pest attack, sowing period and harvesting period using machine learning and AI.
- A farmer friendly mobile app could be done.
- It could be converted into commercial product with the above-mentioned suggestions.
The Agri-Stick was prototyped with minimum cost and robust features. It is capable of sending the sensor data to cloud where we can analyse, process and use it for the betterment of agriculture. It is a plug and play device where you can stream the sensor data in webpage once you placed it on the field and connect it to the internet. This project helps farmers to improve their agricultural practices with the help of technology. For all these, we need to invest once for the Agri-Stick and depends on the usage we need to pay for the cloud services. By automating the manual processes and introducing this kind of devices may attract many people to change into farming career. This will change the current situation of agriculture.
“I believe in the future of agriculture, with a faith born not of words but of deeds.”Message to the readers:
Any suggestions to improve the project are welcomed. Some of the steps were skipped during writing the instructables. So If you have any doubts feel free to ask.
Step 28: REFERRENCES
- Raspberry Pi - https://www.raspberrypi.org/
- LoRa - https://www.semtech.com/lora
- Arduino - https://www.arduino.cc/
- Amazon Web Services - https://aws.amazon.com/
- SQLite - https://www.sqlite.org/index.html
- Python - https://www.python.org/
- MQTT - http://mqtt.org/
- Dash & Plotly - https://dash.plot.ly/
- DS18B20 - https://www.elementzonline.com/downloads/DS18B20....
- DHT22 - https://www.sparkfun.com/datasheets/Sensors/Tempe...
- Capacitive Soil Moisture sensor - https://media.digikey.com/pdf/Data%20Sheets/DFRob...
- Apache HTTP Server - https://httpd.apache.org/
- Putty - https://www.putty.org/
Credits
Kavinkumar-Nkl
I am a tech enthusiasts willing to build things that can solve the world's problems like agriculture
Related products


Leave your feedback...