





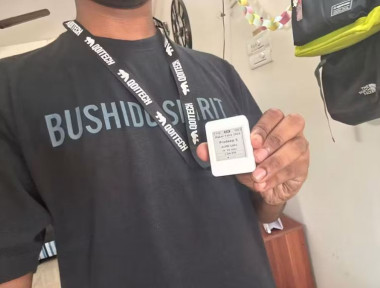
E-paper Digital Id Badge

About the project
A reprogrammable smart conference / event badge on a Waveshare ESP32-S3 touch e-paper board: it shows your details, a scannable QR code.
Project info
Difficulty: Easy
Platforms: Everything ESP
Estimated time: 2 hours
License: GNU General Public License, version 3 or later (GPL3+)
Story
Paper conference badges are dead the moment they are printed - wrong name, old title, a QR link you cannot change. This project replaces that scrap of paper with a tiny always-on e-paper badge you can re-program from your phone in seconds. E-paper is the perfect display for it: it is razor sharp in sunlight, needs ZERO power to hold an image (the badge keeps showing your name even if the battery dies), and looks like real printed ink.

The badge has three pages you flip through with a single button: an INFO page (name, event, company, ID and a live clock), a QR page (a scannable code for your link - LinkedIn, vCard, ticket, anything), and a Wi-Fi SETUP page. On that last page one button press turns the board into its own Wi-Fi hotspot serving a little web form; connect with your phone, edit any field or the QR link, set the clock, hit Save, and the badge redraws instantly. Everything is stored in flash, so it survives a reboot or a dead battery.
Get PCBs for Your Projects Manufactured

You must check out PCBWAY for ordering PCBs online for cheap!
You get 10 good-quality PCBs manufactured and shipped to your doorstep for cheap. You will also get a discount on shipping on your first order. Upload your Gerber files onto PCBWAY to get them manufactured with good quality and quick turnaround time. PCBWay now could provide a complete product solution, from design to enclosure production. Check out their online Gerber viewer function. With reward points, you can get free stuff from their gift shop. Also, check out this useful blog on PCBWay Plugin for KiCad from here. Using this plugin, you can directly order PCBs in just one click after completing your design in KiCad.
What it does
- Info page: shows event, name, company and ID as a clean printed-style badge.
- QR page: a big, auto-sized scannable QR of whatever link you set.
- Wi-Fi config: the board becomes a Wi-Fi hotspot with a phone web form - no re-flash, no app.
- Editable fields: name/event/company/ID/QR-link/datetime, saved to flash (NVS) + the RTC.
- Two buttons: one button cycles the pages; another starts/stops the config hotspot.
- E-paper efficiency holds the image with no power; runs for a very long time on a small LiPo.
Things used in this project


The hardware: what the board gives you

The Waveshare ESP32-S3-Touch-ePaper-1.54 is a tiny all-in-one board - the display, sensors, clock and battery management are already on it, so there is essentially no wiring. Its main features and functions:

- ESP32-S3: dual-core 240 MHz, Wi-Fi + Bluetooth LE, 8 MB flash + 8 MB PSRAM.
- E-paper display: 1.54" 200x200 black/white panel (GDEY0154D67 / SSD1681). Supports a clean FULL refresh and a fast, flash-free PARTIAL refresh.
- Touch: FT6336 capacitive touch (this project uses BUTTONS instead, to save power - see below).
- RTC: PCF85063 real-time clock keeps date/time running even when the CPU sleeps.
- Battery: LiPo connector, USB-C charging, and a battery-voltage ADC so the badge shows its charge.
- Extras: BOOT and PWR buttons, a user LED, plus an SHTC3 temp/humidity sensor, an ES8311 audio codec, mic, speaker and a microSD slot (unused here, but available to extend).
How it works
The firmware is a small state machine of three pages. One button (BOOT) cycles them; on the Wi-Fi page the other button (PWR) starts or stops the config hotspot.

Configuration flows from your phone, through the board's own Wi-Fi hotspot and web form, into flash (fields) and the RTC (clock), and finally back onto the e-paper:

Build it step by step
- Install the Arduino ESP32 core (3.3.10) and the libraries in Table 2.

- Vendor the QRCode library into the sketch folder (see the gotcha below) - copy its qrcode.h and qrcode.c next to the .ino.
GitHub - ricmoo/QRCode: QR code generation library in C, optimized for low-power devices, such as Arduino. · GitHub

- Open the EventBadge sketch, select the board settings, and flash over USB-C.

- On boot the INFO page appears. Press BOOT to cycle to the QR and Wi-Fi pages.
- On the Wi-Fi page press PWR, connect your phone, and configure the badge )
Using the badge
Press BOOT to move INFO -> QR -> Wi-Fi SETUP -> back to INFO. Transitions are the fast partial refresh, so it feels snappy.
Page 1:

Page 2:

Configuring over Wi-Fi
On the Wi-Fi SETUP page, press PWR to start the hotspot. The screen shows the network name, password and address:
Page 3:

Page 4:

Connect to the AP

And then open 192.168.4.1 IP Address.

Here you can configure everything, That's all.
Use cases & applications
- Conferences / events: a reusable, updatable badge for staff, speakers and visitors.
- Office name tags: a desk or door nameplate you update from your phone.
- Networking: the QR can carry a vCard, so people scan your contact instantly.
- Exhibitions: show a ticket / booth QR that you can swap without reprinting.
- Any e-paper sign: the same 3-page + Wi-Fi-portal pattern fits any e-paper info display (menus, shelf labels, meeting-room signs).
Wrap‑Up

The E‑Paper Digital ID Badge redefines how we share identity at events and workplaces. By combining the ESP32‑S3’s connectivity with a low‑power e‑paper display, it delivers a reusable, customizable badge that updates instantly from your phone. Its three‑page interface — Info, QR, and Wi‑Fi Setup — makes configuration effortless while preserving battery life. This project proves how smart design and minimal hardware can turn a simple name tag into a dynamic, connected device ready for any occasion.
Credits
Related products




Leave your feedback...